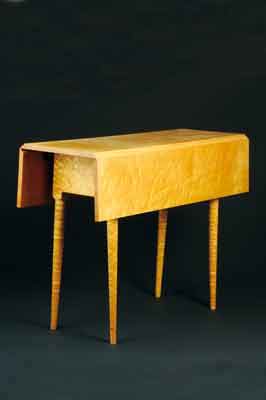
We build a Shaker table designed by Barry Jackson

Drawing out the frame end assembly is important for accuracy
Preparation
Whether using cherry or maple, stable, well-seasoned timber must be selected, especially for the top. Boards of sufficient width ought to be available for the leaves, but the centre board could prove to be more difficult. If so, two narrower boards will have to be butt jointed and dowelled, allowing an additional 2mm (5/64in) on the thickness for finish planing to 19mm (3/4in) after gluing (see photo 1).
Measurements shown in the cutting list are finished sizes. Adding an extra 10mm (3/8in) on both ends of each leg will ease routing the mortises and allow for waste when cutting the angled tops and feet to finished length.
On a piece of strong paper or a suitable board, make a full-size drawing of one frame end assembly, including the full length of legs (see photo 1). This will prove invaluable when setting the correct angle of 2.5 degrees on the sliding bevel and also for checking finished accuracy. Again with accuracy in mind, brad-pointed bits are recommended for drilling the dowel and pivot holes (see photo 2).
Legs
All mortise and tenon dimensions are shown. Check that the wood for each leg is perfectly square in section, I glued together two blanks to make my legs, then mark out the length, allowing 10mm (3/8in) waste on each end (see photo 3).
Mark the mortises on one leg then transfer the measurement with a try square to the others (see photo 4).
Hold each leg firmly in a vice and rout the blind mortises as shown or use a chisel mortiser if you own one (see photo 5).
When the full depth of 20mm has been reached, clean out the ends with a chisel, remembering to angle the mortises which accommodate the frame end tenons.
Mark the centre on both ends of each leg ready for turning between centres. The long, straight taper is turned first, followed by cutting the rounded chamfer. This must be done very carefully, taking care not to splinter the corners of the squared section (see photos 6-7).
Finally, sand down through the grades to a fine, smooth finish before removing from the lathe.
Frame
You can use a router or a bandsaw to cut the tenons. Particular attention must be paid to ensure that these faces are cut accurately to length and shape (see photo 8).
Clamp each frame side and end firmly to the bench during this operation, checking with the leg mortises for fit before determining the final depth of cut.
When this is done, remove the haunch waste from the top end of each tenon and dry assemble the two frame ends. These can now be checked against the full-size drawing before marking and bandsawing the leg tops level with the top side of the frame ends. Mark out and cut the legs to length, taking care to maintain the correct angle at the feet.
Dry assemble the frame, checking all is square in plan view. Before taking it apart, mark the ends of the frame sides
to correspond with the tops of the leg tops. Remove the sides and plane down to the lines. Mark out and cut the 12 x 36mm (1/2 x 19/16in) wide through-mortises which accommodate the rail ends. Set the sliding bevel to the correct angle and use it as a guide when cleaning out with the chisel. A 1.5mm (1/8in) deep groove, cut into the frame sides and ends, provides a subtle decorative touch.
At this stage, glue and cramp the two end frame assemblies only (see photo 9).
Allow time to set, remove the cramps and drill the dowel holes of the glued joints 6mm diameter x 22mm deep (1/4 x 7/8in). Glue and fit the dowels, leaving the heads just proud for cleaning up later (see photo 10).
Rail
Mark out the joints, checking with the full-size drawing for accuracy before cutting. Try it for fit and then as a further check, dry assemble the rail and complete frame to make sure the distance between the rail’s shoulder joints is correct. Mark the pivot hole centres and rounded ends, then drill the holes at the correct angle and shape the ends.
Finally, the upper side is cut to match the bottom face of the leaf support. The complete rail and frame assembly can now be glued and cramped (see photo 11).
When the glue has set, dowel the remaining joints as with the frame ends and leave it to set. Using a smoothing plane, clean up flush all the projecting dowel heads and joints, and then sand clean, slightly dulling the sharp edges of the posts, feet and undersides of the frame.
Top
Those who have not made a drop leaf table before must not be discouraged by the apparent sophistication of the rule joints. With the correct matching bits, in this case a Bosch 12.7mm cove bit and rounding over bit, these can be cut very easily by router.
Arrange the prepared boards to give the most pleasing grain effect, then mark an identification line diagonally across the top faces to keep the correct order and alignment.
To make absolutely sure the edges to be jointed match perfectly, I have skimmed them up using a router and straightedge guide. The guide can be cut from 6mm (1/4in) ply, 150mm (6in) wide by 930mm (365/8in) long, then hand planed dead straight the full length of one edge.
Clamp the guide and board to a bench, with the guide overhanging at each end of the board. This will enable the router base to maintain a straight path at the start and end of each cut.
Repeat this when cutting the joints, but with the straightedge guide positioned to just allow the cutter guide bearing to make contact with the board edge (see pages 55-56 for rule joint cutting).
Lay the jointed boards upside down on a flat bench and mark out the hinge locations so that they just clear the leg posts. Fit the hinges with the pivot pin centre positioned as shown (see pages 59-60 for hingeing the rule joint).
Note that when the leaf is down, its leading edge is just above that of the top. Straighten off the ends with a smoothing plane then remove the leaves before marking out the centres of the six screws which secure the top to the frame.
I suspect the Shakers used dowels only, but I shall continue with the following alternative, leaving the option open to you.
Drill the 8mm (5/16in) diameter plug holes 8mm deep, then straight through with a 4.5mm (3/16in) diameter bit to give ample clearance for a 32mm (11/4in) long No.8 countersunk-head steel screw. Lay the top on the frame and hold securely in the correct position using two boards, one under the frame and one on the top, both overhanging to enable cramping. Bradawl through the pre-drilled holes and drive the screws in lightly (see photo 12).
Remove cramps and boards then place upside down and leave on the bench. From 9mm (11/32in) diameter dowel, cut the 9mm long plugs and keep for later.
Leaf supports
Mark out and cut the supports, with the direction of grain running lengthwise. Plane the tops and bottoms carefully to the lines before marking the dowel hole centres. These 18mm (23/32in) deep holes must be drilled very accurately, ideally using a pillar drill with the support held securely in a vice.
Finish shaping then check for fit between the rail and the top as shown. If all is well, cut the upper and bottom pivot dowels, 26mm (11/32in) and 28mm (13/32in) long respectively. Sand a slight chamfer on the ends then glue them in (see photo 13).
Re-fit the leaves, just lightly tightening one screw in each
hinge flap.
Mark out the leaf-support dowel centres and the position of the 5mm-deep (3/16in) recesses which accommodate the rail’s projecting
ends (see photo 14).
Remove the leaves and top, chisel out the round-bottomed
recesses and drill the two 10mm-deep (3/8in) dowel holes at the correct angle.
Assembly
Apply a thin coat of wax polish to the leaf support pivot dowels and
their respective holes. Fit the supports into the rail ends and
lower the top board into position.
Screw down firmly then glue and tap home the plugs, leaving the heads slightly proud.
Before reassembling the leaves, the finish will have to be applied to the rule joints beca.