These fantastic projects are perfect with summer on the way
Plant stand

You will need:
Two 2.7m or longer lengths 250 x 50mm
(10″ x 2″) for the stringers
Piece of 150 x 50mm (6″ x 2″) scrap wood 380mm (15″) long
Two 2.7m or longer lengths 250 x 50mm
(10″ x 2″) for the shelves
60mm (2 1/2″) deck screws
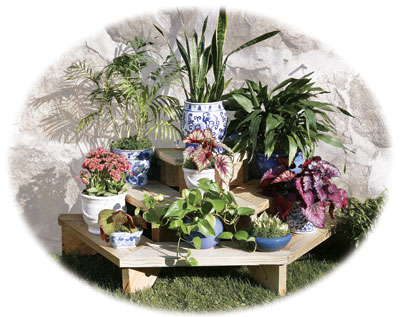
This neat looking plant stand can be made any size that suits your situation but three tiers and 250 x 50mm (10 x 2″) wide boards to accent reasonable size pots seems to make sense. Use pre-treated timber for a long service life. It is supported by stringers (like staircase side rails) with step shapes cut in them. The rear two lie flat and are connected by a bracing piece, while the front two have 60 degree bevels cut on the back edges so they splay apart. All four stringers are then screwed together and the steps made to fit cutting them at a matching bevel that meeting in the middle of the front stringers. Screw the step into place and sand off any rough edges. If you make two of these units they can be placed back to back to make a freestanding plant ‘island’.
Clock cover
You will need:
From Oak
Front Fascia 380 x 60 x 21mm x 2off
Rear Rafter 330 x 100 x 21mm x 2 off
Gallows Bracket 330 x 45 x 21mm x 2off
Gallows Bracket 180 x 45 x 21mm x 2off
Brace 305 x 70 x 21mm 2off
Finial 190 x 35 x 35mm 1off
Turning Length 280mm
Roof Decking (ply) 360 x 190 x 12mm
A delightful way of showing and protecting an outdoor clock. The roof is made of 12mm (1/2″) ply pitched at an angle of 33 degrees. It helps to do a full size drawing on a sheet of MDF first. There is a decorative fascia at the front and simpler swept rafters at the back joined in the middle with a loose tongue. At the side are two uprights and curved brackets which support the cover. There are side pieces joining the back to the front. The rear rafters have keyhole slots to hang the clock cover on and there are two more holes on the wall brackets covered with domed buttons. The ply is then glued and pinned on. The timber is given a suitable exterior finish like Sadolin and the lead fitted in place with copper nails.
Letter box
You will need:
TOP 298mm x 121mm x 15mm PLY
FRONT 252mm x 356mm x 15mm PLY
BACK 381mm x 252mm x 15mm PLY
SIDES 396mm x 90mm x 15mm PLY
BASE 282mm x 90mm x 15mm PLY
A simple but secure letterbox for situations where you don’t want to cut a letterflap in your front door or you wish to have it fixed on the fence near the front gate. It is made from exterior ply with a slant on the lid and a slot big enough to accept normal size mail and possibly newspapers too. The slot can be made using a router and a template. Likewise the front flap can be machined out in the same way. The whole thing can be nailed together and finished with an exterior coating. The lid can be covered either with an offcut of roofing felt or a wide piece of roof repair strip.
Hanging basket bracket
You will need:
Scraps of MDF
Masonry plugs
Screws
Undercoat
Gloss paint
A simple but effective way to support a hanging basket and easy to make. Make from a couple of 19mm (3/4″) exterior grade ply offcuts. Draw the shapes out on paper first, experiment until you arrive at a pleasing shape for both the wall plate and the hanging bracket. Then stick it on the ply and drill the two holes in the wall plate to fix it to the bracket and the two holes required for wall fixing. The latter ones are countersunk on the front face while the first two are countersunk on the reverse. Now use a scrollsaw or fretsaw to cut out the intricate shapes and then remove the paper templates and lightly sand off any roughness as necessary.
Garden tools
You will need:
Roughing gouge
skew chisel
spindle gouge
These handy garden implements will make your work in the garden so much easier. The designs consist of a two twine reels, one with a scissor recess, the other with an acorn finial although you could choose a thistle design instead. Then there is the string line which has two turned pins and finally a dibber and some bamboo balls. It is entirely a turning project using a roughing gouge, skew chisel and spindle gouge. You can use any hardwearing hardwood such as ash, elm, beech, sycamore or oak. The skew cut indents on the dibber are highlighted by using steel wire to burn them in. The bamboo ball are used as protection for raspberry canes etc.
Adirondack table
You will need:
A) Legs 445 x 125 x 19mm (17 1/2 x 5 x 3/4″) x 4off
B) Side rails 535 x 55 x 19mm
(21 x 2 1/4 x 3/4″) x 2off
C) End rails 495 x 55 x 19mm
(19 1/2 x 2 1/4 x 3/4″) x 2off
D) Top 610 x 175 x 19mm (24 x 7 x 3/4″) 1off
E*) Ends 230 x 175 x 19mm (9 x 7 x 3/4″) 4off
F) Top 610 x 75 x 19mm (24 x 3 x 3/4″) x 4off
G*) Ends 140 x 75 x 19mm (5 1/2 x 3 x 3/4″) 4off
H) Ends 65 x 75 x 19mm (2 1/2 x 3 x 3/4″) x 4off
* Parts cut to size during construction.
A charming little table for those lazy summer days, designed in an American style that is at home here too. The frame is quite straightforward, consisting of flat tapered legs screwed to two rails then the shaped end rails are fitted on followed by the curved end facings. Once that is done, the top slats are cut to length and screwed down using counterbored holes and then plugged with matching wood plugs.
Log walk
You will need:
A log: just a log.
Here’s a simple but effective way to give your garden rustic character. First find your log and ask a friendly tree surgeon to cut it into 50mm (2″) slices or they may have a freshly felled trunk they can slice up for you. Now lay the slices out in the chosen location making sure the ground is prepared and flat, perhaps with overhanging borders plants along the router of the path. Fill up all the space around the slices with bark mulch.
Flower tower
You will need:
A) Legs 1194mm x 25mm x 25mm (47 x 1 x 1″) x 4off
B*) Rail blanks 560 x 25 x 6mm (22 x 1 x 1/4″) x 4off
C*) Rail blanks 125 x 25 x 6mm (5 x 1 x 1/4″) x 4off
D*) Rail blanks 460 x 25 x 6mm (18 x 25 x 1/4″) x 4off
E*) Rail blanks 360 x 25 x 6mm (14 x 1 x 1/4″) x 4off
F*) Rail blanks 255 x 25 x 6mm (10 x 1 x 1/4″) x 4off
G*) Vertical trim strips 810 x 38 x 3.2mm (32 x 1 1/2 x 1/8″) x 4off
H) Base 95 x 95 x 12mm (3 3/4 x 3 3/4 x 1/2″) x 1off
I) Cap 65 x 65 x 12mm (2 1/2 x 2 1/2 x 1/2″) x 1off
J) Finial 150 x 38 x 38mm (6 x 1 1/2 x 1 1/2″) x 1off
K) Mounting blocks 90 x 19 x 19mm (3 1/2 x 3/4 x 3/4″) x 2off
* These components need to be cut over-length initially
Simple but stylish, this tower or pyramid is just nail and waterproof glue carpentry. To add a more ‘designed’ look the top is carefully shaped as are the intermediate uprights while still giving plenty of planting climbing opportunities. Follow the materials list and cut out all the parts first then shape the spear tip profiles and finally assemble using galvanised nails. Note that the sides have been angled at 11.5 degrees to give the right effect.