Peter Wood gets to the bottom of Windsor chair seating by making a travisher
In this article, I’m going to show you how to make my favourite tool for shaping Windsor chair seats. With the travisher, you can rough out a seat blank very quickly, taking large shavings, or take the finest of shavings for a finishing cut. It’s the tool that students like to use on my courses and perfect if you want some texture to any sawn surface that doesn’t need to be planed flat. A medium- or heavily-curved travisher will produce a highly textured surface to a rustic shelf or the finest of chair seats.
You can source old travishers online, but they usually need a lot of remedial work to get them functioning properly, so in this article I’m aiming to enable you to either be able to replace the body of an old travisher you already have, or to fashion a new body to match a new blade.
Tools used:
• One travisher blade
• Assorted drills and chisels
• Spokeshave
Wood
• One block of hard wood – sycamore (Acer spp.), ash (Fraxinus spp.), beech (Fagus spp.), maple (Acer spp.), or apple (Malus spp.)

STEP 1: Here is a selection of old and new travishers – the older tools are darker and have longer handles while the lighter ones are my own design. I find this design more comfortable and it reduces the chance of scraping your knuckles across the work.
STEP 2: Travisher blades can be found in a number of curves. Working from left to right we have, a No.6, No.4 and No.3, the number denoting the degree of curvature. It can be useful to have a range of curves, but the middle curve No.4, works in most situations, so if I was only making one travisher that would be the curve to use.
STEP 3: The tangs are at 90° to the blade and tapered, so with careful fitting you should aim to create a friction-fit, which will hold the blade secure when using, but is easily knocked out when you need to sharpen the blade.
STEP 4: I have used a nice block of sycamore which is hard wearing and good for the travisher body. This block is 140 x 70 x 180mm. From this I should be able to make three travisher bodies approximately 45 x 70 x 180mm. Reduce the size to 35mm if needed. If fitting the No.6 blade, you will need to increase the depth of the body.
STEP 5: First, plane the block smooth and square on the sides as well, so you start out with an accurately-prepared workpiece.
STEP 6: Use the blade as a template for marking. On the wider face, mark the centre point of each tang. The blade needs to be seated in the middle of the block.
STEP 7: Turn the block over to the adjoining face with the tangs lining up with your previous marks and draw in the curve of the blade.
STEP 8: The tangs of your blade may be different to mine, but I’ve used a range of bits from 7mm to 9.5mm. A cordless drill or bit and brace work well when drilling the tang holes, but if you have a pillar drill, it does make life a lot easier still.
STEP 9: My drilling point for the tangs was 20mm from the back of the body. This gave a nice sole on front of the blade and enough ‘body’ behind to hold the tangs. Drill a pilot hole with your smallest dill bit and check that the holes line up.
STEP 10: Work the tangs into the holes by gradually increasing the diameter of the hole. As the diameter of each drill bit increases, reduce the depth of cut and you will end up with a tapered hole. For the final fit use a file to open up the tapered hole. Note this will result in a tight fit.
STEP 11: Once the blade is seated, remove the blade and cut out the previously-marked curve. With the body curved, enlarge the tang holes again until the blade sits onto the wood. You can now mark the outline of the blade. The wood inside the line is waste and needs to be removed.
STEP 12: Start by sawing slots out of the waste and then use a chisel to cut the waste away.
STEP 13: Knock away most of the waste using the chisel and mallet, using the chisel to pare away the rest of it. You need a smooth surface where the shavings will travel away from the body. Shavings will catch on any rough areas and quickly clog up the travisher.
STEP 14: Next, use a small chisel to chop out the area where the tang meets the blade. Care is necessary to avoid chipping out the slot.
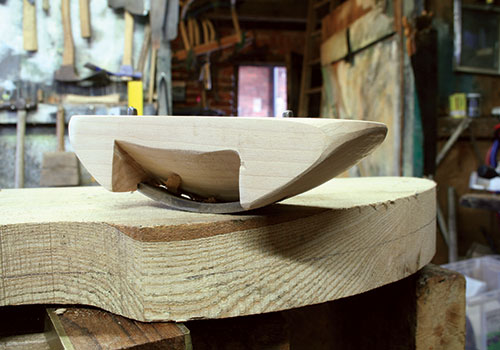
STEP 15: Check again to see if the blade is seated properly, it should fit tightly fit, needing a sharp tap with a small hammer above each tang to seat fully. I like to have a small throat between the sole of the wooden body and the blade. This gives a much cleaner cut, but if you’re after rapid stock removal, carefully pare away more wood, opening the throat. Use a spokeshave to clean up the saw marks, adjusting the curve to finally match the curve of the blade to the body. The sole of the travisher should slope slightly away from the blade edge.
STEP 16: Once happy with the shape, round off the corners and smooth all edges. Remove some of the travisher body until you’re content with how it feels in your hands.
STEP 17: The travisher takes a little getting used to, but you can control the depth of cut by rolling your hands forwards, riding on the sole, for a shallower cut. By pushing the tool away from you and rolling your hands forward as you come to the end of the cut, the cut then lightens until it stops cutting. This can be done with the travisher askew for a more slicing cut.
STEP 18: By rolling your hands backwards, the tool then rides on the blade for a deeper, more aggressive cut, so it will then dig in. With a little practice and fettling of the travisher shape, it is a joy to use.