Some while ago I read a comment from a woodcarver, who wondered if the great Grinling Gibbons had used steam-bending to create the ultra-thin curved stems in his stunning foliage carvings. Having seen several of Gibbons’ carvings at close quarters, I am sure he did not – but the question made me wonder if steam-bending may have some potential for woodcarvers, so I decided to give it a try.
After a bit of experimenting, I found that there is indeed a place for steam-bending in the woodcarver’s repertoire of techniques for ‘shaping wood’. Steam-bent stems and leaves, when combined with finely-carved flowers, can enable you to create a large, widely spaced naturalistic floral carving, which is self-supporting and economical on wood. Furthermore, the ‘steam cooking’ process not only enables you to bend the wood, but seems to make it stronger than it was originally, allowing you to create leaves and stems as thin as those made by nature.
Why use steam?
Thin carved flower stems are naturally fragile, unless the stem is straight and runs directly along the grain. Wood fibres are quite strong along their length, but they have a limited attachment to the fibres alongside them, which is why short-grain sections are fragile. Steam-bending offers the option of producing a long curved, bent, or even twisted stem or leaf in which the grain runs from end to end and through all the changes in direction. The penetrating heat and moisture of steam plasticises the lignin between the fibres, allowing them to ‘slide’ alongside each other. The fibres can then be bent into a different shape which, on cooling again, will become fixed.
Making a simple steamer
Steam-bending on a small scale is quite a simple ’low-tech’ and low-cost process. The equipment can be cobbled together from things you may already have or which you can buy quite cheaply. You basically need two things: a source of steam and a ‘steam chamber’.
Bending some stems
There are quite a few woods that can be steam-bent, but as the finer parts of a foliage carving will usually be made of limewood (Tilia vulgaris), I have used this wood for the steamed parts as well. Most limewood bought by carvers will have been kiln-dried. This is thought not to be as good as air-dried wood for steam-bending, but I found that in such thin sections you can use kiln-dried wood for all but the tightest bends. However, if you can obtain some fairly ‘green’ air-dried wood you should find it easier.
Tools used
Steamer:
• A wallpaper steamer
• A 600mm length of 65mm square rainwater downpipe, plus fixing brackets
• Plywood about 460 × 900mm for stand
Tools:
• No.3, 10mm fishtail gouge
• No.4, 6mm fishtail gouge
• No.9, 20mm gouge
• No.8, 8mm gouge
• No.9, 16mm curved gouge
• No.5, 13mm curved gouge
• No.8, 8mm curved gouge
• Straight ‘V’-tool
• Curved ‘V’-tool
• 16mm hooked skew chisel
• 10mm skew chisel
• Spokeshave
• Also bandsaw and lathe if you have them
Using steam safely
1. Steam is scalding hot and can cause severe burns if it comes in contact with your skin and eyes. Make sure the steamer is turned off and the steam has subsided before you open the steam chamber
2. Use eye protection when opening the steam chamber and keep your face well back. Wear steam-proof gloves or gauntlets to remove the wood – it will be hot to start with but will quickly cool down when removed from the chamber
3. Steam is immensely powerful under compression so make sure the vent never gets blocked
4. Keep steam away from electrical equipment and plug sockets
STEP 1: A simple and reliable way of producing steam for a sustained period of time is to use an electric wallpaper steamer, which you can buy quite cheaply from most home decorating stores. This has a water reservoir, which holds enough water to boil for around an hour – which you’ll find is plenty long enough for our purposes – and a length of tube, which you can connect to the steam chamber. Alternatively, if you do not have this equipment readily available, you can use an old-fashioned hob kettle on a portable gas hob, plus a length of tube. Modern electric kettles are no use as they have a thermostat that switches them off when they boil. The ‘steam chamber’ just needs to be a container in which you can enclose the wood you want to steam. For this project, I have used a 600mm length of 65mm square rainwater downpipe, which I have fixed to a plywood stand. This is quite adequate for steaming flower stems and leaves. You need to fix it at a slight slope; this will allow the steam to flow upwards and the condensation to drain downwards
STEP 2: Make a ‘plug’ to fit each end of the tube. In the lower end, drill a hole big enough to take the steam tube and a small hole at the bottom edge to allow water to drain out
STEP 3: Drill a hole about 10mm diameter in the upper end plug to allow steam to escape. The tube must not become pressurised
STEP 4: You need to make a rack out of wire, dowels or anything that will allow the steam to circulate around the wood
STEP 5: You can then start by making some stems for your flowers. Cut a piece of wood 6mm thick and about 450mm long and then cut it into strips 6mm square in cross section. Use a spokeshave or knife to shave off the square edges, then sand it to a smooth fairly round cross section
STEP 6: Put a few stems into the steamer. Start it up, put a bowl under the downhill end to catch the drips and let it run for about 30 minutes from the time the steam starts to come out of the end. Don’t be alarmed if your plastic downpipe sags and the wooden end plugs swell up with the steam – they will survive
STEP 7: Make up a bending board, firstly by drawing some fairly shallow curves a bit tighter than you want the finished stems to be. Cut up some pieces of plywood or MDF to form the inside of the curves and some smaller pieces to push the ends in, then fix them to the board
STEP 8: Switch off the steamer after 30 minutes and extract the wood. Working quickly, press one end of the stem into the top of the curve then work it round the curve and tuck in the bottom end. Try to get all your stems into the formers within a few minutes of coming out of the steamer
STEP 9: Now make up a new bending board and try a few tighter bends. For these I used air-dried wood made into stems which measured about 4-5mm thick. Steam them for about 30 minutes and bend them into tight curves to give you flower heads that will hang down. You can fit more than one stem in each former
STEP 10: For a more convoluted shape, tape a thin steamed stem round a piece of pipe so the top end forms a loose spiral
STEP 11: It is best to leave the stems in the formers overnight. When you take them out the next day they will remain set in their new shape. Give them a light sanding to remove any stains from the water or the formers. We now have a variety of stem shapes in 4-6mm thicknesses, which can be used in a display
STEP 12: Before making the leaves you need to think about the type of flowers you want to make. As we are using steaming to aid the process it is best to go mainly for flowers with long thin curved leaves. We can also throw in a few daisy-type flowers for variety. Leaves generally need to curve outwards from the stem and need just enough thickness to accommodate a central vein or a ‘V’ along the centre, with a slightly convex or concave shape along each side. I settled on a method of cutting strips of lime, bending them into curves, cutting the leaf shape out of the bent strips and carving in the detail. Cut some wood into strips 5mm thick and from 18-30mm wide
STEP 13: Make another bending board with some deeper and more robust formers. After 30 minutes in the steamer, push the strips firmly but gently into the formers and leave them overnight to set
STEP 14: This produces strips of bent wood that you can cut into leaf shapes for the fritillaries, tulips and daffodils, a few wider ones for the lilies and some smaller flatter leaves for daisy-type flowers. Mark these out on the curved strips so you have a ‘stem end’, which can be grafted onto the stem and a range of curves towards the tip end. Cut these out with a bandsaw
STEP 15: Carve the bent wood into a proper leaf shape with a central ‘V’ or vein and such surface veins or hollows as suit the type of plant. You will find the grain follows the curves of the wood, making the leaves easier to carve and much stronger than leaves carved from a block. Create sharp leaf edges by paring away each side. Carve a hollow at the stem end that will fit snugly round the stem so it can be glued in place
STEP 16: I decided to make two tulips, two daffodils, three fritillaries, three big daisy-type flowers and two large lilies, all life-size. Because the stems and leaves are so thin we need to make the flower petals as thin as possible or they will look clumpy in comparison. The tulips are best carved from lime, 50mm square in cross section, each flower 65mm long with the grain running lengthways. Hollow and rough out the overall shape – use a lathe if you have one – then refine the individual petals. Hold the block
in a vice to carve the detail
STEP 17: Cut the tulip off the block and make a hole the stem can pass through. Use a chisel to split the end of the stem into six segments so it gives the appearance of stamens. Poke it through into the tulip so it protrudes about 20mm inside and glue it in place. Also glue two of the leaves in position using masking tape to hold them in place. Arrange the leaves so they curve away from the stem
STEP 18: Use abrasives to make the join of the leaves merge smoothly into the stem. Here are the two finished tulips
STEP 19: The process for the fritillaries is the same, coming from a block 50mm square and each flower 55mm long. They are a slightly different shape to the tulips and hang downwards. Give them a dimpled finish to represent the spots of the snake’s head fritillary
STEP 20: The three daisy flowers are 90mm across and 25mm thick. Glue them to a backing board with card in between. Petals that run across the grain need to be clustered to support one another when undercut
STEP 21: When the top surface is carved, prise the flowers off the card and very carefully undercut the petals. Keep on undercutting until you have very thin petals that will not look too thick against the thin stems and leaves. Make a hole underneath for the stem
STEP 22: Glue the flowers to the spiral stems that were made using the pipe, with two leaves to each stem, angled a bit flatter than the other leaves
STEP 23: The daffodils are best made up in two parts: the ‘bell’ formed by the same method as the tulips from a block 35mm square × 45mm long and the outer petals made by the same method as the daisy flowers from a piece 75mm across × 30mm thick
STEP 24: Finally, the two Turk’s cap lilies. Each one is deeply carved from a block 120mm square × 80mm thick with the grain running crossways. The flower needs deep and careful hollowing while the block is glued to a backing board and card
STEP 25: The underside needs painstaking undercutting when removed from the board. The petals need to be shaved very thin to avoid looking clumpy
STEP 26: The finishing touch is to carve six very thin, slightly curved stamens and a central stigma. I used some bent wood left over from the leaves, working them in batches while still attached together. It is a fiddly task so expect to produce several rejects to get the number you need. You can then use abrasives to make them thinner still
STEP 27: The next step is to glue the lily to the top of a stem then assemble and glue the stamens in place. Glue the leaves on to finish the job
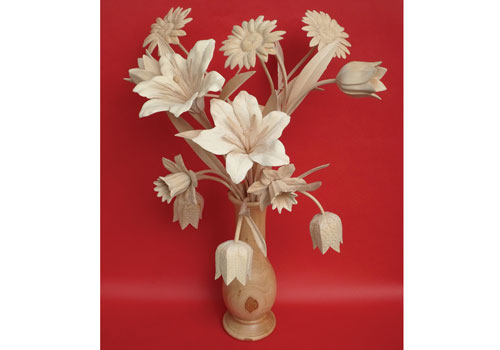
The finished display
STEP 28: You can use any vase big enough to hold the bouquet, but if you are a woodturner, or have a friend who is, you may want to make a wooden vase about 250mm tall with a 40mm hollow core
STEP 29: Now is the time for some very delicate ‘flower arranging’. Cut the stems to suitable lengths so the flowers are arranged in tiers spreading upwards and outwards. If you pour some dry sand into the vase at the end, then it will keep the vase stable and hold the flowers in place
Top tips
1. Use real flowers, or photos of them, as your models. If you include the individual features and irregularities of your particular model in the carving, then it will look
more natural
2. Practice carving flower petals and leaves thinner and thinner to the point of destruction to learn how far you can go
3. Create stems of different lengths and curves to suit different types of flowers. Arrange them in the vase with the largest boldest flowers at the top and the smaller ones in layers beneath them
4. Many woods will darken with steaming but most – including lime – will return to their natural colour when dry – pear and beech will become pink.
