Duane Cartwright explains how to carve these festive cards, which make great handmade gifts
As it’s coming up to the festive season, I thought I would share my idea for carved Christmas cards. These cards make a unique and personal gift – perfect for the person who has everything! The good thing about carving these cards is you can practise different styles and techniques of carving and lettering, they are also reasonably quick projects, which is perfect if time is limited, plus the cost of the wood is minimal. In theory the cards could be any size but to keep costs and time down, I made my cards about 150mm high x 90mm wide x 5mm thick. The thickness is something to keep aware of as, if they’re too thin, there is very little wood to carve and overall strength can become a problem. However, if they’re too thick the cards will look bulky. To help keep strength in the cards I carved these in an incised (intaglio) style, like the Egyptian tomb carvings, but you could carve in shallow bass relief or chip carve. You could even carve the same design in different ways on different cards by carving one incised, another as a bass relief and another in chip carving. Perhaps try to see how many different ways you could carve one design/pattern! I am showing a couple of ideas here in this article that have proven popular, the tree of life and a robin perched on a spade handle, but as with any carving the choice of what you can carve is limitless. You can also carve cards for other special occasions, such as Easter, birthdays, weddings, etc. I’ve used basswood (Tilia americana) for these cards as the incised carving and staining show up more with the plain wood, but using a piece of wood with a nice grain pattern and then polishing it after carving to show the grain is another option.
Tools used:
* 6B carbon stick
* V-tool or veiner
* Shallow gouge
* Hooked skew
* Sanding sealer
* No.9, 5mm sweep gouge
* Wood stain
* Cabinet scraper or sharp edge
* Abrasives
* Microcrystalline wax
* Acrylic finish
Wood:
* Basswood (Tilia americana): 150 x 90 x 5mm

STEP 1: The wood needs to be sanded on all sides and brought to a finished state before you begin. If you’re using one of my patterns, print out the design at the required size and transfer by rubbing a 6B carbon stick over the back of the printed design, then temporarily tape the printout onto the card and trace over the pattern to transfer it
STEP 2: Using a V-tool or a veiner, start to carve around the outside edge of the design. A V-tool will give a crisper carved outline but the 1 veiner will give a cleaner outline, especially on the curved wavy edges and on the end grain of a cut. Test your gouges on a piece of scrap wood and choose whichever tool gives the crispest and cleanest outline
STEP 3: With the tree of life you only need to carve down both sides of the trunk and around the crotch parts of the branches and halfway along the ground. Next, use a shallow gouge and a hooked skew to lower the background …
STEP 4: … sloping it into the sides of the trunk and the crotch of the branches
STEP 5: Round over the trunk and branches. Add some bark detail using a veiner gouge, making sure the bark effect goes in the direction of the branches and trunk
STEP 6: Give the card a coat or two of sanding sealer and leave to dry, then use a No.9, 5mm sweep gouge or similar and with a scooping motion carve out the leaves. Ideally you want a teardrop shape to the leaves. Practise on scrap wood and try out different gouges until you produce a leaf shape you’re happy with
STEP 7: Now use a V-tool to carve in the roots. Carve at different depths to produce thicker and thinner roots
STEP 8: You can now stain the card. Use a small artist paintbrush to apply the stain. To prevent bleeding, dip the brush into the stain and then touch the bristles onto a rag to remove the excess stain, then paint the stain into the carved leaves and roots. Wipe up any excess as soon as you’ve applied it
STEP 9: Use a cabinet scraper or sharp edge to scrape back the layer of sanding sealer. You could use sandpaper but that may blur the detail. Give the card a light sanding with a fine abrasive and then another coat of sanding sealer. When the sealer is dry, cut back and apply your chosen finish
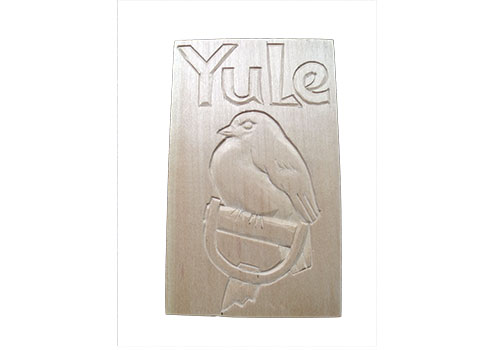
STEP 10: For the incised intaglio cards like the robin, start by carving the outline with a V-tool or veiner, keeping aware of the direction of the grain so you cut and keep a clean outside edge, the inside edge of the robin will be carved and rounded over. Also carve/ incise on the outside edge of the pen marks so they will be removed by the carving procedure, which will mean less cleaning up later
STEP 11: With the incising of the outline done, use a fishtail skew gouge or similar to start to round over the inside edges of the outline giving the robin its shape. Use a V-tool or veiner to separate the detail of the feathers and carve in the eye and beak. Then continue shaping and blending in the detail – keep it simple, you just need to show the basic features
STEP 12: Use a V-tool to carve in the robin’s claws. For simplicity, incise the claws as you only need to suggest them rather than carve them to look realistic
STEP 13: The lettering on the cards can be carved in many different ways, but I carved the lettering incised the same as the rest of the card by carving around the outline of the letters. It’s best to keep the lettering simple and bold so it is not only easier to carve but also easier to read. Try out different lettering styles and techniques on a scrap piece of wood first before committing on the card itself
STEP 14: Once all of the carving is done, carefully sand through the grit grades removing any remaining pen and tool marks. Next, give the cards a coat of sanding sealer and apply your chosen finish. I used a microcrystalline wax on the front and sides of the card to give a nice hard-wearing finish to the carving, and I used an acrylic finish on the back of the card so a message can be written easier with a pen by whoever sends or gives the card
Top tips
1. The 6B carbon stick lasts years, that’s loads of patterns transferred for just a few pence and once the carbon is on the back of a pattern you can trace over a few times before having to applying more carbon
2. Using a veiner rather than a V-tool will create less end grain tear-out while carving around the design, but on the other hand the V-tool will give a crisper definition
3. Using sanding sealer on a carving you wish to stain before you begin carving will help to prevent the wood stain from bleeding into the surrounding areas4. If you’re planning on staining the roots and leaves, try to use air-dried wood if you can, as the fibres in the wood remain stronger and the stain doesn’t tend to bleed as much as it does with kiln-dried wood.