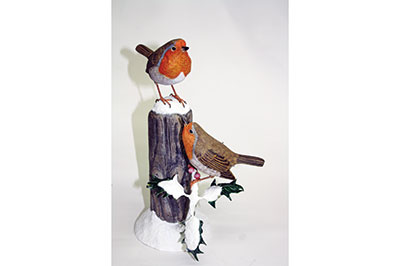
Mike Wood carves a pair of festive robins
Robins in a winter setting: it’s an iconic image that many people find heartwarming. My chirpy duo here pick up on the traditional scene with snow, holly and berries – they are also fun to make. Depending on where you live, you might not get too much snow, but you can use your imagination as to how you create your perfect setting for the robins. This step-by-step guide deals mainly with the birds themselves. Anyone who has robins in the garden will know they are feisty, territorial birds who think nothing of trying to badger and intimidate larger birds who dare to encroach on their patch. Indeed, they’ve been called birds with attitude – the male certainly struts his stuff and puffs himself up to show off – so you should definitely have fun creating your own version of this wonderful creature.
Tools used:
• Grinder and saburr wheel
• Rotary carving unit
• Coarse taper
• Sanding bobbin
• Ruby taper
• Bullnose stone
• High-speed grinder
• Plastic wood for eyes
• Copper tubing for feet and legs
• Pyrography machine
• Airbrush
• White gesso
• Paint: burnt & raw umber, red, violet, green, Payne’s grey, orange & dark brown
• Large brush & rigger paintbrush
• Acrylic texture paste
• Copper wire
• Wooden beads for the berries
• Artificial snow
• Personal protective equipment: Eye & face protection, lung protection (dust mask as a minimum) and extraction
Wood:
• The wood used for the birds and holly leaves is lime (Tilia vulgaris)
• Weathered old pine post

STEP 1: First, create cut-outs from the patterns provided. Also keep your plan handy as all of them are needed for reference. Once you have your plan, use it to mark and cut the right-sized timber sections. A bandsaw will make light work of cutting the initial block to the block-like bird shape. Then using the cut-outs, refine the shape using a combination of chisels and burrs, to get much closer to the cut-outs. Be careful not to remove too much wood at this stage as you will need it later on to refine the shape
STEP 2: Once you have your rough outline, refine it a bit more until you have a clearly defined bird shape. A combination of rotary burrs – coarse and medium – will help with this, but of course it can be done by using handtools and then abrasive. When happy with the shape, pencil in the wings
STEP 3: With a small-toothed burr held in a rotary unit, define the body form further and cut in the eye sockets. You need to create the definite wing positions, shape and curves of the body. After this…
STEP 4: … use a bobbin sander to smooth out the surface without removing the detail of the body curves and other similar items
STEP 5: Now define the lower wing area, face and rear section of the bird using a rotary burr. Then draw in the wing pattern…
STEP 6: … and tail
STEP 7: With a high-speed rotary unit fitted with a small white stone, or similar fine-grit abrasive cutter…
STEP 8: … carve in the feather detail. There are many types of cutter that can be used for this job so don’t get vexed about using the same one as I have here. You need a fine grade that cuts on the side and the end so you can angle a cut and incise at the same time. You can cut the detail by hand using a chisel and V tool. I find this a harder route (it also takes longer), but if time is no issue, then the choice is yours. Since I make my living carving birds, time is important and the power-carving route is quick and efficient. It does, however, need a few cutters and a rotary unit and the process also produces more dust than hand carving
STEP 9: With the same unit and stone put some texture on the head, breast and back. It is all about creating clearly defined texture and detail to delineate between areas and also create a lifelike feel. Note how the burr/cutter is clogged a little. You can clean these up by running a cutter at lowish speed over a rubber block. Secure the rubber block in a vice, or screw it down, so it does not whizz away when a running cutter touches it. The two birds are similar, but if you create a ‘puffed-up’ showy male, then the body shape for each one can be made slightly different
STEP 10: Do the same on the tail and undertail coverts. Again it is all about mimicking the real thing. There is depth change in the texturing and also the body – when shaped and sanded it is not uniformly even. Real feathers vary in density and size and the slightest movement of the body, or even a breeze, can ruffle them and create a different look.
STEP 11: You might have guessed that I work on the birds in tandem; each step is undertaken on each bird as I go along. If both your birds are now also carved up to and including step 10 then you are working efficiently. Don’t worry if you haven’t been working in this way, however, or prefer to work on one bird at a time. Some people like to finish one bird before moving onto the next. The danger in crafting both birds at the same time, I suppose, is that you might be more likely to duplicate any mistakes. This could prove annoying if you don’t realise your error until later on and the problem can’t be rectified. Now, since I am working on both birds in sequence, repeat step 10 on
the second bird
STEP 12: Next, carve in tail feathers and add appropriate detail as per your reference material
STEP 13: Using a pyrography unit with a pen fitted with a scalpel-edged wire or tip, or a very thin detail wire or tip, burn in…
STEP 14: … all feathers on both birds using the tip of your choice. Now fit the eyes – I bought mine – using plastic wood. Then smooth out and add detail as required
STEP 15: Note the legs are in place in this and the previous picture.
I make my own, but you can easily buy them, too. They are only loosely fitted at the moment and will be painted and fixed later
STEP 16: Once the pyrography is complete, undercoat both birds all over with white gesso. Next, mix a small amount of raw umber and burnt umber with the gesso, then undercoat the back of both birds
STEP 17: Orange, tinted with a small amount of white gesso, is used to colour the breast area. It’s oft-repeated that robins have a red breast and that’s how they’re depicted on many a seasonal card. In reality, they are orange, but the hues vary a bit from bird to bird
STEP 18: Lighten the face with white gesso and edge all the feathers on the back of both birds
STEP 19: Now darken the inner webs and centre tail with dark brown
STEP 20: Paint under the tail and underwings; the rump and belly have a thin wash of burnt umber
STEP 21: The breast on both birds needs to be edged with a mixture of orange and a small amount of red violet. The grey edging down the eye and sides is painted with white gesso and a small amount of Payne’s grey. The feet and legs are fixed in place with plastic wood and are then painted flesh colour. The tips of each bill are airbrushed dark brown. As I have said before, you can use a brush to colour the birds, but airbrushes make life easier, especially if you plan to create a lot of birds
STEP 22 & 23: Now the birds are complete. Note how the two birds have a different posture and also body shape. One is puffed up and has attitude while the other is leaner and looking upwards more
STEP 24: To make the base, obtain an old weathered pine stump or post and distress it with a combination of burrs, steel and bronze brushes to create the aged look you are after. You can then either scorch or colour the base. The holly is made using copper and the berries are small dyes or painted, wooden beads. The snow is done using a combination of texture paste – to build up volume. While the paste is still wet, it should be covered with artificial snow (you can buy loose artificial snow from modelling shops or online). The snow will stick to the wet surface. Alternatively, you can let the texture paste dry, apply a coat of adhesive over the dry paste and then apply the artificial snow. You can also apply adhesive to other areas of the post and holly and sprinkle the artificial snow over these areas, too, in order to create a more authentic look. Spray snow can also be used, but the loose artificial snow is easier to control and will only stick on the wet surfaces whereas spray snow coats everything it touches
STEP 25: The finished birds can then be placed and secured in the arrangement of your choice. As you can see here, this setting works very well and has one radiant robin looking at its mate.