For this project, I have chosen to use yew. There was no real reason other than finding a very nice clean shake-free log, which was then cut in half and trimmed to size. Different timber could be used to achieve similar results by perhaps using two different timbers for a contrasting effect.
I also made a second version from acacia, but on this version the lid was made to sit lower in the bowl, whilst also having a carved edge. I turned the two vessels differently to see which would work best, but my overall preference would be the carved edge lidded bowl, but with the lid the same height as the yew bowl.
Another option for making a lidded form similar to this one would be to use an entire centre save from the middle of a coned out bowl. Ebony was used to make the finial here, but if you wanted the finial to be black and did not have any ebony, an ebonising spray paint could be used to colour it. The acacia I used had a moisture content of 19% and the yew log 25%. The interesting point is that the acacia had gone slightly out of shape while the yew did not. I have learnt over the years that wet or part-seasoned yew keeps its shape very well.
Step-by-step
1 The finished bowl
2 Start with your chosen log cut in two. Attach a faceplate ring to one half, which should measure approx. 255mm (10in) by 100mm (4in) and the other half 230mm (9in) by 90mm (3 1/2in). Mount the bowl onto the chuck via the faceplate ring and use the 12mm (1/2in) bowl gouge to roughly cut an ogee shape. At this stage, use quite heavy cuts to achieve shavings like these. Lathe speed is around 800rpm
3 Cut a dovetail using a 10mm (3/8in) spindle gouge, which is used to hold the piece to turn out the inside of the bowl. Once the bowl has been completed it will be reverse-chucked and cut to an ogee shape to match the shape of the bowl. Lathe speed is around 800rpm. Mark a small centre dot, using the tip of a 10mm (3/8in) spindle gouge. This is important to get the piece running true when reverse-chucking
4 Having already achieved a rough ogee shape, continue to use the same 12mm (1/2in) bowl gouge with a much finer cut. Make a shearing cut working from the centre outwards. You may prefer to use this tool with the flute facing the wood, with lathe speed around 800rpm. After the gouge work is complete, make a couple of passes with the round-nose scraper, using the tool on its side at a 45 degree angle as a shear scraper. Start this cut by applying the tool to the wood then adjusting the angle slightly until a fine shaving is achieved, then simply follow the shape of the bowl. I find the best results are achieved working from the centre outwards and lowering the lathe speed to about 600rpm
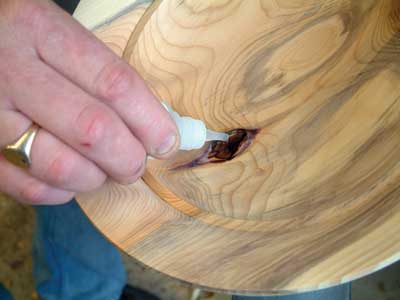
5 After the tool work is complete, take care of the small bark inclusions – I would suggest using a thin cyanoacrylate. Apply this with the lathe stationary and then immediately sand it. You can mix the dust with the glue to fill any voids. The cyanoacrylate will also help to harden off the bark inclusion. Approach this before sanding so that the sanding process will remove any surplus unwanted glue. Then, power sand the outside with grits 120, 180, 240, 320 and 400. The lathe speed is between 450 and 500rpm
6 With the bowl gripped in the chuck using the previously cut dovetail, remove the faceplate ring. Cut out the inside of the bowl using the long-ground 12mm (1/2in) bowl gouge. At this stage, you are cutting down to the shoulder to carry the lid. Leave some wood in the middle which will help keep it stable, with lathe speed around 800rpm. This vessel is going to have the rim on the outer edge rather than the top. To make this cut use the tip of the gouge, pushing the tool through from left to right. Cutting in this direction will prevent any breakaway on the left side of the rim
7 This is one of the last cuts made with this gouge down to the shoulder which will carry the lid. Lathe speed is still around 800rpm
8 With the gouge work finished on the outer part of the bowl, use the previously used scraper. This time, use the forefinger of your left hand to support the back of the bowl, with the tool used working inwards. Lathe speed is reduced to about 600rpm
9 Still using the long-ground gouge, remove the bottom of the bowl. Make the finishing cuts across the bottom with a short-grind gouge with lathe speed at around 800rpm. Use the 10mm (3/8in) spindle gouge to make a small V-cut in the corner of the shoulder to carry the lid. Later, you will need to add a burn line for decoration
10 Keep an eye on the wall thickness with the lathe stationary, as you go along. Ensure you leave some wood in the bottom to help keep the piece stable while working on the outer parts. Use the 12mm (1/2in) long-ground bowl gouge to remove waste efficiently, using the bottom edge of the gouge with the flute facing the bowl, pushing the tool inwards. This tool will now make about a 16mm (5/8in) cut with ease. Do not use this as a finishing cut, only to remove waste quickly. Now, make a few very fine passes with this short-ground gouge. This gouge works better across the bottom curve of the bowl. You may find that the finish given from the gouge is good enough not to require shear scraping. Lathe speed is increased to 1000rpm
11 If you discover any faults, use a few drops of cyanoacrylate to take care of them. To do this, take the bowl and the chuck off the lathe to allow more control to position the glue correctly. Now, sand the inside of the bowl, using both power and hand sanding methods. Some hand sanding is required around the shoulder which will carry the lid, with lathe speed reduced to 500rpm
12 Next, add the burn line to the V-cut made earlier. With the lathe speed at around 1500rpm, use a small piece of formica to burn the line. Apply pressure and the formica will burn on contact with the wood, leaving a controlled burn line. Apart from re-chucking, the bowl is finished
13 Mount what is going to be the lid on the lathe using the same faceplate ring as before and roughly turn it to a dome shape. Use callipers to measure and set them for the shoulder that this will sit on inside the bowl form
14 For the lid, cut the top to a rough ogee shape and cut a dovetail so that it can be mounted into the chuck. The outside can then be finished off by reverse chucking, using the 12mm (1/2in) bowl gouge. Lathe speed is around 800rpm
15 On the inside of the lid, use the long-ground 12mm (1/2in) bowl gouge and follow the ogee shape cut on the top with lathe speed at around 800rpm. Then, shear scrape and power sand with 120, 180, 240, 320 and 400 grits to a finish
16 I normally reverse chuck using a vacuum chuck, but for this project simply mount a small dome-shaped disc into the chuck with a piece of router mat between the two. This will give it grip and stop it marking the wood
17 Make a couple of finishing cuts to the top face with the 12mm (1/2in) bowl gouge, then turn away the waste (the dovetail), leaving about an 8mm (1/4in) pip in the middle. This can be sanded to a finish, then the centre pip removed off the lathe once finished. To make life easier, use a vacuum chuck to finish this off with lathe speed at about 600rpm
18 With the bowl on the vacuum chuck or between centres, make a few fine cuts to finish off. Then, shear scrape and sand to a finish with 120, 180, 240, 320 and 400 grits
19 Use a piece of ebony 63mm (2 1/2in) long by 38mm (1 1/2in) square to make the finial. Then, use the small roughing gouge to take it from square to round, with lathe speed increased from 1500 to 2000rpm
20 Shape the finial using a 10mm (3/8in) spindle gouge, with the piece held in the jaws of the chuck and move the tailstock away. The important thing here is to make sure the direction of the cut is downwards. This is a close-grained timber from which you should be able to achieve a very fine finish straight from the tool
21 Continue to use the 10mm (3/8in) spindle gouge and use your thumb and forefinger of your left hand to support the finial, keeping the cutting edge of the gouge well above centre. Then, hand sand to a finish starting with 240 through to 600 grit
22 Use a 1.5mm (1/16in) parting tool to part down to 7mm (9/32in). Stop the lathe and check with Vernier gauges until 7mm is reached. Cut a second parting cut below the 7mm shoulder to part it from the lathe, and reduce lathe speed to 1000rpm
23 Drill a 7mm hole in the lid, while the piece is mounted on the lathe in the vacuum chuck. If this lid was turned as first described, trapped between centres and the small plug removed, that would leave a centre mark where the hole could be drilled off the lathe, either by hand or on a pillar drill, taking care not to go right through. Glue the finial into place with a couple of drops of medium or thick glue. Once in place, leave to dry for several hours before applying an oil finish
24 Next, reverse chuck the base, as shown here. Use a dome-shaped piece of wood held in the jaws. This is a similar shape to the inside of the bowl with a piece of anti-slip mat placed between the two
25 At the base, include what was the dovetail in the depth of the base and change to a nice curved shaped side. Cut the base slightly concave, leaving the small pip in the middle which can be removed off the lathe once you have finished the project. Alternatively, you can do this on a vacuum chuck, using the tailstock to align the bowl and then move out of the way so that the bowl can be worked on freely. Lastly, finish the base using Danish oil, then buff to a finish with a cotton cloth. Repeat the same steps with the lid
26 Here we have the finished lidded bowl with finial
