Paul Loseby turns a screw-topped hollow form from Spanish olivewood, complete with blackwood finial
There are certain times when you want to make a hollow form with a screw top. This can either by as a purely aesthetic piece – such as a cookie jar, for example – or it can also be used as an urn for holding ashes. In this sense, this design is also suitable as a vessel for holding pet ashes, if you have sadly lost a pet. For this reason, this screw-topped hollow form is very multi-functional. In this article I will tackle the issue of turning screw threads in particular, as well as the other steps involved in creating this piece, such as hollowing.
Shaping the external form
Step 1
Any timber will be fine for this project, but I had a 300 x 200mm (11 x 8in) piece of wet Spanish olivewood which I chose to use for its aesthetic appeal. When you place between centres, ensure that the pith is off-centre as from here cracks can originate. I turn the pith away in the piece and drill it out and fill it in the base
Step 2
Here I am using the tailstock end as the base and so, therefore, I need to square the end with pull cuts of my swept-wing bowl gouge, then I make a suitably sized spigot to hold in my largest chuck jaws
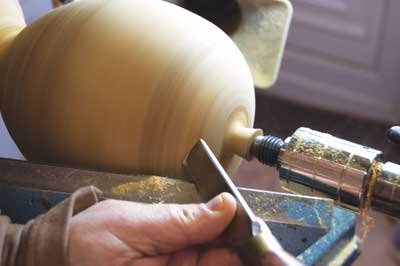
Step 3
When I first started to turn wood, I must have been slow on the uptake and it was some time before I realised that it is easier to cut from the outside of the tree in, and not along the length. Next, I rough shape the outside with my bowl gouge
Step 4
I have now turned the timber, holding it in the chuck so that I can concentrate on the overall shape. I use pull cuts for the main shaping and a push cut with my spindle gouge for the refining cuts
Step 5
I use a large SAD (Seasonal Affected Syndrome) bulb as the light is the equivalent to daylight and shows blemishes and defects better than any other light I have used
Step 6
For the final cut, I use a freshly sharpened shear-scraping finishing tool which normally leaves a beautiful blemish free surface
Hollowing and chasing threads
Step 7
To start the hollowing, I always drill down to the required depth using a 12mm (1/2in) drill bit, drilling short sections at a time. When completed, it is time to consider the hollowing…
Step 8
…using a 12mm (1/2in) spindle gouge followed by the Proforme Hollowing Tool. I open the neck up to allow a collar of dense material African blackwood, in this case, to be fitted…
Step 9
The collar will now fit snugly into the opening of the hollow form and makes a wonderful thread
Step 10
Fit the blackwood collar and chase an internal thread using whichever tpi chasers you feel confident with
Step 11
You can now finish hollowing the piece out. If this is to be an item to use rather than display, keep the wall thickness to about 6mm (1/4in)
Step 12
Once hollowed, you can now apply your preferred finish. Ensure not to finish the neck where the collar will be glued
Dealing with the base
Step 13
Remembering to part upwards to form a convex base, part off to 10mm (3/8in) Then, saw the remaining spigot off flush with the piece. On the remaining base, make the remaining 10mm (3/8in)) piece into a short spigot
Step 14
The pith is off-centre and we can now drill it through by using a 10mm (3/8in) drill bit
Step 15
A part of the 10mm (3/8in) spigot from the base now glues perfectly into the hole where the pith was. The base now just needs sanding and finishing
Thread chasing
Step 16
Using the remaining blackwood, turn a spigot to thread into the collar made earlier. Use the same tpi size thread chasers as before
Step 17
Once the thread is cut, shape the rest of the lid. Continue to shape the finial as far as possible while it is still held in the chuck
Step 18
Once the lid is shaped, turn the finial round and hold it in a sacrificial threaded recess. Shape, sand and finish as required. The hollow form with blackwood collar is now complete
Alternative threading method
For those who do not know how to thread chase and want to use an alternative, here is a trick gleaned from the Internet. The trick is to use plastic plumbing fittings to replace threads cut earlier. The cost worked out at a very reasonable £4. Some may see this as cheating, but I think it’s more a case of working to our strengths rather than getting frustrated with something that can be solved in another way, or using another method.
I know many have tried and struggled with thread chasing – if it is a subject that fascinates you then persevere and repetition will yield results. If it is of passing interest, maybe one project every year or so, then the time spent learning it is time that can be spent on other things you enjoy making.
Step 1
Plastic to male iron connector from our local plumbing merchants turned down so that…
Step 2
…the female section fits into the hollow form and the male section forms part of the lid
Step 3
There is a small recess at the side into which the rim where the plastic insert sits. I will make the plastic insert shorter then glue it in place
Step 4
If using the plumbing insert, make a hole in the wood left (the lid) in the chuck to fit the male plastic thread perfectly
Step 5
Remove the thread part, turn the wood around and expand the jaws into the hole you have just made. Now, turn the top and then sand and finish as required and glue in the insert
Step 6
An alternate design using plastic plumbing parts for the threads.
