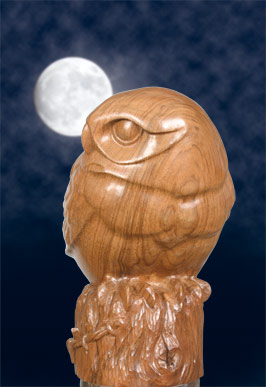
Bill Prickett shows you how to carve this little owl

Using the cut-out template for the front view, line up the centreline with the one just drawn on the front of your wood
Bill Prickett shows you how to carve this little owl
The idea of carving a little owl was the result of some memorable encounters with these characterful members of the owl family. While walking near our home in Kent in an area of mixed trees and grassland, they could easily be seen through the twilight sitting on top of convenient fence posts, scanning the grass below and in front of them for any insects which took their fancy. When suitably enticed, they would swoop down from their posts and attack their chosen prey.
Timber
As I was going to keep the detail to a minimum on this piece, it was a good opportunity to use a block of English walnut (Juglans regia) that I had been hanging onto for some time now. Walnut can have the most beautifully figured grain along with a warm, nutty brown colour. If too much detail were to be carved into this wood, the strong figuring in the grain would conflict the result would be that neither the wood, nor the carefully carved detail, would be shown to their best advantage.
When carving your own version of the little owl, you could also try using walnut or alternatively, you could use most other types of hardwoods. Some other good examples would be: sweet chestnut (Castanea sativa), ash (Fraxinus excelsior), elm (Ulmus spp), lime (Tilia spp), cherry (Prunus avium), apple (Malus sylvestris) and even mahogany (Swietenia macrophylla).
To start
By all means use the accompanying plans to help with the initial bulk wood removal, but gathering some reference photographs of your own always helps.
Enlarge the accompanying plans to the size you require � mine measured 180mm (7in) in height then cut them out. Make certain that your chosen piece of wood is large enough in all directions to accommodate the sculpture.
Step-by-step
1: The completed little owl
2 & 3: Draw around the right side view template onto your chosen timber and cut around this line, preferably with a bandsaw. Draw a centreline through the front of the body and down the back. I find that the flexible ruler pictured is quite useful for such jobs
4 & 5: Using the cut-out template for the front view, line up the centreline with the one just drawn on the front of your wood and mark the waste areas that lie outside the template. Remove these areas with a substantial gouge I used a No.11 1in through the full thickness of the wood to the other side
6: Referring now to the rear view, draw the outer curve of the wings. After removing the waste, curve over the corner to leave the back of the wings gently rounded using some kind of broad, flat tool
Working with templates
7: A little difficult to see from the photograph, but while looking straight down on top of the head area, draw a centreline for the head this dictates which direction the owl will be looking, in this case approximately 90degrees to the right of where the body is pointing, and runs from the tip of the beak to the middle of the back of the head. Next, draw symmetrically, two lines sweeping back from the beak tip at an angle of approximately 40degrees from the centreline to the left and right sides of the head. These lines give the plane that the eyes with be carved into, and the waste to either side of these can be removed
Removing the waste
8 & 9: The sharp corners at the front of the body can be rounded and the width of the post that the owl is sitting on is marked, and the waste removed. Note if, like myself, you are intending to carve the short length of barbed wire that is stapled to the post, be certain to leave the wood that this will require on that side
Wings and tail
10, 12 & 12: On the back and sides of the owl, draw the wing tips, tail and leading edge of the wings. Run around these lines with a V-tool and drop the level of the tail area back a bit so that it appears to come out from under the wings
13: Mark where the right wingtip overlaps the left, then lower the left wing area slightly
Feather groups
14 & 15: Draw lines to define the lower edge of each feather group. Carve along these lines with a No.10 1/4in gouge, and lower the upper part of each feather group down to the bottom of these gouge lines. Round over any sharp edges with a flat tool
16: Define where the feathers of the head area overlay those of the chest, along with any shaping and contouring of the front of the owl’s body. Go over these lines with the No.10 1/4in gouge and round off the edges
Eyes
17, 18 & 19: Mark with crosses the centre of both eyes. Make certain that they are as level as you want them to be when viewed, not only from the front, but from above as well. When happy, draw in the lower limit of the brow
area as well as areas around the beak that need refining.
Draw the eyes but include room for the eyelids as well. Carve around this line with a good sharp V-tool then dome over the eye areas with a small flat tool. Mark in the circle of the actual eye apertures and other facial features, then carve the eye in with a V-tool and dome the eyeball with the small flat tool I used a No.1 1/4in fishtail
Feet
20: Looking down on where the feet will be carved, mark a centreline for each toe, then draw lines either side of the centrelines which taper towards where the talon will be. Remove the waste wood between the toes down to the level that relates to the top of the post that it is standing on
Feathers
21: On each region of the wings that relates to a particular group of feathers, draw in the individual feathers. Carve in each feather using a No.11 3mm or similar gouge. Take some wood off the top edge of each feather with a small flat tool to produce an angle which will help give the impression that each feather is poking out from underneath the feathers directly above it. Lightly round off any sharp edges on each feather prior to sanding
Barbed wire and post
22 & 23: There are three key features to the short length of barbed wire: the length of two pieces of twisted wire; the barb; and the staples that nail it to the post. Draw these features on to the wood left to accommodate them and carefully remove all the wood that is not needed any more
24: As the barbed wire gets closer to completion, draw in other features of the post weathered end grain, splits, etc. One detail which I thought worked particularly well was to carve “splits”into the post that originate from where the carved staples are supposed to have been driven in
25: Refine the toes and thin the talons down to the final shape prior to completing the post details
Finishing
When combing a sanded finish with a tooled finish it is important to get the sequence right. With this particular piece the owl is to have a sanded finish which will show up the beauty of the walnut. To give a little contrast, I chose to apply a tooled finish to the fence post section. If I were to finish the post area with nice crisp, clean toolmarks before I sanded the owl, it would be very difficult to avoid scuffing the tooled area with sandpaper and therefore ruining it. A better way is to roughly carve the area to have the tooled finish before completely sanding the smooth areas to the finished state, then go back to the tooled area and carefully finish it up.
When sanding the owl, work through grades 180, 240, 320 and 400grits. Pay attention to work into every detail by carefully folding or rolling the abrasive to get into all the tricky little areas. Try backing up your abrasive with strips of old credit card – guitar plectrums work even better – to give a bit of stiffness.
When completely finished with the 400grit abrasive, go back to the -post-section and very carefully apply the final surface tooling. Brush off small chippings and the dust from the sanding.