David Barron considers the effects when he makes three dovetailed and bridle jointed boxes with six different woods

Three hours later all the tails are cut and cleaned up
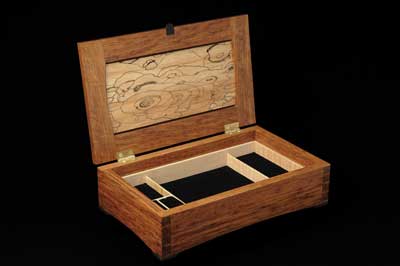
A couple visiting the Sussex Guild Christmas show in Midhurst bought the brown oak wall cabinet featured in F and C 150 and the following day were back to ask me if I would make them a small jewellery box to match. Luckily I had one last piece of the spalted maple to use as a panel. For the lid I echoed the bridle joints of the wall cabinet and used through dovetails on the corners of the box.
I decided to make three boxes at the same time to help replenish my show stock, also selecting some attractively grained olive (Olea europaea) and a piece of figured English walnut (Juglans regia).
The walnut was offset with ash (Fraxinus spp) and the olive blended very well with lemonwood (Calycophyllum candidissimum). The spalted maple (Acer spp) was used with brown oak (Quercus robur) to match the wall cabinet.
It was obvious at this stage that the boxes would each have a different character and although all the pieces were the same length I chose to make the lemonwood pieces thinner and more delicate because the very fine grain of lemonwood is suited to a more delicate approach than the more open grained oak and ash, photo 1.
Making dovetails
Before marking all lines for the dovetails I waxed the face of my brass cutting gauge, photo 2; as with metal planes this makes progress a lot smoother and more controlled. I used my magnetic dovetail guide, photo 3, to cut the tails straight and absolutely square, photo 4. The waste was removed with a jewellers saw and pared back to the line with a razor sharp chisel, photo 5.
The groove for the base is cut on all sides and a tight fitting piece of scrap used to align the pieces for marking out the pins. These are again cut with the magnetic dovetail guide, using the other side. Working very carefully to the waste side of the line, I glued up every joint straight from the saw to save a great deal of time. Before assembly the bottom and all the internal surfaces are finished with five coats of thinned shellac.
After assembly the joints are cleaned up with a sharp plane and the help of a drawer board which is clamped on the bench and overhangs the edge. Any very small gaps can be closed by planing in the direction of the gap, causing the fibres to break slightly, photos 6-9.
Cutting bridle joints
The bridle joints are cut on the bandsaw using a fine toothed blade, photo 10. The table should be set at exactly 90 degrees to the blade and the fence at exactly 90 degrees to the table. I find a fixed table is better than a tilting one as once the adjustments are made it stays put.
I cut the mortices first and then used spare pieces to achieve the desired fit for the tenons. This took a while but, once set, all 12 tenons were quickly cut.
Making panels
Stopped grooves for the panel are cut on the router table. A gentle curve is then cut with a spokeshave, photo 11, taking care not to encroach on the joint shoulders.
After dry fitting to ensure tight joints, the panel is glued up using yellow glue and lots of clamps, photo 12. Clamp the corners as a precaution against the water-based glue causing expansion that would result in a glue line.
The panels are cleaned up with a high-angled smoother to avoid tearout. My planing board, photo 13, is ideal for supporting all kinds of work without the risk of bowing associated with bench vices. The end stop is adjustable to zero for planing thin stock and the side support has four different positions.
Chamfered curves are spokeshaved, photo 14, on the bottom edges of the brown oak box and thin feet of African blackwood (Dalbergia melanoxylon) are glued at each corner.
Dividers
The box partitions are evenly thicknessed down to 4.2mm, photo 16, and then cross cut to a friction fit.
The halving joints are cut on the tablesaw using a crosscut stop and an accurately sized spacer.
The first cut is made with the spacer in place against the fence stop and the second cut is made with the spacer removed. This gives an accurate and repeatable 4.2mm slot for a nice firm push fit, photo 17.
Finishing touches
The small handles are recessed into the underside of the lids. The olive handle for the lemonwood box is carved and shaped whilst the other two boxes have more simple tongues.
All the boxes are finished with about 10 coats of diluted blond shellac cut back with 400-grit sandpaper, followed by two coats of a carnauba/beeswax blend, and buffed to a sheen.
Conclusion
As mentioned at the beginning, each of these boxes has a different feel and a different appeal. The exposed joinery is more time consuming, but if done carefully adds an extra dimension as well as extra value. The three boxes took 56 enjoyable hours to complete.