
Mark out the section of the bowl rim that will be the scroll, and cut away the rest of the rim to blend in with the inside of the bowl
Dolphins have had a special place in our ornamental vocabulary from ancient times to the modern day, and especially so in the classical revival of the 18th century. They had a particular significance in France where, from the 14th to the 18th centuries, the heir to the French throne was officially titled Le Dauphin (the Dolphin).
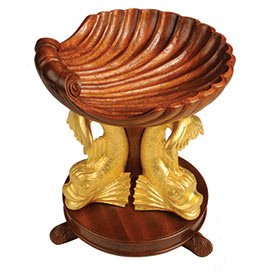
Ornamental dolphins were seldom portrayed as the mammals we know and love today. To our predecessors, dolphins were fish. They were usually portrayed with scales, spiky fins and even gills. I have kept to this tradition with this design where they are employed holding up the shell dish of a tazza – a bowl on a stem. They are gilded to contrast with the sapele mahogany of the tazza, in the spirit of a period when people delighted in gilded ornament.
1. The completed tazza
Turning the dolphin block
2. Prepare a full-size profile drawing and your ‘cylinders’ of wood. Make a cardboard cutout of the inside profile of the dolphins and cut it in half at its narrowest point. These cardboard cutouts allow us to hollow out the centre of the block of lime from each end, effectively creating a ‘negative’ of the stem of the tazza
3. Mount the lime block between centres on the lathe, put a spigot in the tail end to fit your chuck, and square off the ends. Turn the main diameters of the external profile of the dolphins at this stage. Remove the tailstock and, with the tail end held in the chuck, hollow the inner profile of the head end. Use a 32mm Forstner bit to drill through the centre of the block
4-5 You hollow what will be the part of the dolphin that sits against the base and lower half of the stem, keep checking with the bottom half of the cardboard cutout until it fits exactly. Remount the block by the opposite end. Because the end has been hollowed, make up a flat plywood disc 203mm (8in) in diameter, screw a faceplate to it and screw it to the lime block, using the tailstock to centre it. Hollow out the tail end to fit the other half of the cardboard cutout. Finish off the outer profile of the dolphins, and undercut the tail overhang so it is about 4mm (5/32in) thick at the outer edge
6. Remove the plywood plate and cut the block into three equal segments of 120°. As they come apart, the profile of the dolphins appears
Turning and carving the tazza
7. Prepare the wood for the stem and base. Turn a spigot in the stem and a mortise to match in the base. Glue the stem to the base using the tailstock to centre and compress the joint while it sets. Shape the base and stem to fit the inside of the dolphin blocks. Measure the diameters off the drawing, then test-fit the lime. Put a 50mm (2in) mortise in the top of the stem
8. Next, mount the bowl blank on a faceplate. Turn a 50mm (2in) spigot on the underside to fit the mortise in The stem. Now start turning the underside of the bowl. Ensure that you continually test the fit of the stem and the dolphin blocks until the dolphin tail fits snugly against the underside of the bowl
9. Remount the bowl by the spigot, and turn the inside so that the bowl wall is roughly about 10mm (3/8in) thick. The next stage is to make a 22mm (7/8in) rounded rim around the edge of the bowl – this rounded rim will eventually form the lovely stylised scroll which sits at the back of the shell
10. Mark out the section of the bowl rim that will be the scroll, and cut away the rest of the rim to blend in with the inside of the bowl. Cut out the two ‘scalloped’ sections beside the scroll
11- 12. Carefully mark out and carve the concave shell markings in the inside of the bowl and the convex markings on the underside. Line up the concave and convex sections on the inside and outside so that there is always at least 3mm (1/8in) wall thickness
13. Carve the ‘hinge’ part of the rim into a classical scroll, blending the scalloped sections into it. Slope the outer edges of the shell to accentuate the concave/convex undulations of the shell
Making the feet
14. The three feet of the tazza are based on a smaller version of the scallop shell. First rough out the feet with a bandsaw or coping saw, then shape the shell with a 10mm No.3 gouge. Finally, use a V-tool and an inverted No.5 gouge to carve the ribs of the shell
15. Glue the shell dish onto the stem, with the grain direction at right angles to the base for the best appearance. Screw and glue the feet in place at 120º intervals directly under where the dolphin heads will be. Give the tazza about 4 coats of French polish
Carving the dolphins
16. Now to move onto carving the dolphins. Mark a centreline on each of the dolphin blocks, and draw on the side profiles so that the width of the body is roughly equal to the thickness. Take care to leave the side fins at full width, and the end of the tail about 63 mm (3½in) wide. Rough out the profiles with a coping saw
17. Shape the sides of the body into the side fins, dorsal fin and tail. Use callipers to get each dolphin exactly the same width at each point. The moulded curve of the underside – including the side fins – must be left so the body sits naturally against the curve of the tazza. We start to reap the benefits of the work done on the lathe
18-19 Carve the detail of the face, mouth and eyes. Make sure both eyes are in the same position so everything looks straight from the front, top and sides. Carve the detail on the fins and tail, giving them traditional ‘fishy’ features
20. Finally, carve simple scales all over the body from behind the head to the curve of the tail. Keep the scales in proportion to the width of the body, getting slightly smaller towards the tail
Gilding and finishing
21. To get a true 18th century finish, the dolphins are gilded with real gold leaf (23¾-carat) over a base of acrylic gesso. You could use artificial gold leaf instead, but you would need to seal it against tarnishing. Genuine gold leaf needs no sealer, but may wear if handled frequently. Seal the finished dolphins with sander sealer. Apply several coats of acrylic gesso – only one over the scales but about 6 everywhere else – with a little yellow food colouring added, over the course of a day. Next day, apply a coat of gilding size and, when touch-dry, apply the gold leaf
22. Mark the position for the dolphins on the tazza and scrape off a thin strip of the French polish to give a good glue bond. Carefully glue the dolphins in place without getting glue on the French polish.