Andy Coates sets off using simple off-set techniques to make a contemporary decorative bowl
As I have mentioned in previous articles, bowls are pretty much the stock-in-trade for most woodturners. However, that does not mean that all bowls need to be the same, or in fact, equal. There are always ways to lift your bowls from being ordinary to something more interesting. I hope you will find this bowl challenging and different. This project is for an off-set, beaded bowl.
If you have the advantage of an off-centre chuck, you can make use of it here as appropriate. In essence though, this project is intended to show what is possible with an ordinary scroll chuck and some forward planning. I use a pillar drill but you could manage without one, with careful drilling.
I have not made one of these bowls for a good few years, and after revisiting my methodology, decided to change the way in which I previously made them. This means they are safer for an inexperienced turner to produce. You may find alternative methods to create a similar bowl. These techniques can be used for a number of different projects, and with due consideration to safety can be adapted for further exploration of off-set projects.
Tools used:
Ash (Fraxinus excelsior) blank – 254 x 75mm
Scrap cylinder of wood – 60 dia x 50mm
Pillar drill
45mm and 55mm Forstner bits
10mm bowl gouge
2mm parting tool
5mm parting tool
8mm twist drill bit
Strip of Formica
Abrasives 180–400 grits
Cellulose sealer and paste wax
PPE: facemask, gloves, dust mask/respirator

STEP 1: Mark the exact centres on both sides of the bowl blank. Chose the best face
for the top of the bowl. Using the 45mm Forstner bit, drill a hole 5mm deep in the top face of the blank. Use this to mount the blank and then true up the other face and the edge of the bowl
STEP 2: Remove the blank from the lathe and return to the pillar drill. On dead centre, drill a 55mm hole 5mm deep. Then mark a point 20mm away from the centre of this hole and now carefully drill a second hole, with a diameter of 45mm. You may wish to clamp the blank down securely to prevent movement
STEP 3: Next you need a scrap of timber to turn two 5mm thick discs, one 55mm diameter and one 45mm diameter. Place the 55mm disc in the appropriate hole, securing with double-sided tape, and drill through at the 45mm hole
STEP 4: You will now have a filler for the smaller mounting hole. Repeat the process to create a second 45mm disc and drill through at the 55mm hole. You will now have two filler pieces. Set these aside for later use
STEP 5: Remount the blank on the single central mounting. Draw a pencil line about 5mm beyond the widest point of the off-set mounting points. Do not turn the surface inside this marked circle
STEP 6: Now begin to put some shape in the blank with a long-ground bowl gouge, using pull cuts on the wing of the tool. Work progressively to the rim of the bowl
STEP 7: Placing the toolrest safely on the front side of the bowl, take a cleaning cut for the first 20mm to give a reference edge for the finishing shaping cuts. Leave a rim 6mm thick. Complete the shaping and then abrade from 180 to 400 grit
STEP 8: Apply cellulose sealer, working well in to the grain. Burnish dry and then de-nib with an ultrafine impregnated nylon fibre pad. Repeat a further two times until a perfectly sealed surface is achieved. You may decide later to alter the shape at the base of the bowl, but seal and finish anyway
STEP 9: Take the smaller, 45mm filler and, using doubled-sided tape, fix into the off-set hole. Ensure correct alignment
STEP 10: Now mount the bowl on the 55mm hole on medium O’Donnell jaws (or other extended reach jaws). Rotate the blank to achieve the most concentric hold. Try and ensure one jaw faces the middle of the filler. Tighten the jaws but do not over tighten. Check the quality of the hold by trying to rock the bowl in the jaws
STEP 11: Mark pencil lines to give two circles, 95mm and 105mm diameter from the centre of the bowl
STEP 12: Using the corner of the small parting and beading tool cut clean ‘V’ cuts at each of these lines. Take care as the tool can skip out of the cut on faceplate work. Ensure you are cutting on the midline
Top tip: If you are uncomfortable with forming the beads with a beading and parting tool, you might try a 10mm spindle gouge, or even a bead forming tool. With the spindle gouge, take care as the tool enters the base of the cut to avoid the tool cutting on the opposing surface as this will result in a catch. A bead forming tool can be useful for the more inexperienced turner, but this will leave an inferior surface, which will require further sanding
STEP 13: Using the point of the parting and beading tool only, form a bead, working first on one side then the other, avoiding the exact middle of the 10mm bead. Take light cuts and twist the point of the tool through the cut, gently feeding the tool forward as the cut progresses
STEP 14: When the bead is complete, take a slim piece of Formica and scorch lines in the ‘V’ cuts. This is used to seal the wood fibres. A wedge of dark hardwood would also serve the same purpose if you do not have Formica
STEP 15: Leave a 5mm inner rim and then begin hollowing the bowl. Ideally you will form a hemispherical bowl with a pleasing curve. Depth should not exceed 40mm. Use a scraper to finish if necessary, and then abrade through 180 to 400 grit. Seal with three coats of cellulose sealer and then apply paste wax
STEP 16: Using a fine flat paintbrush and black spirit stain, carefully stain the bead. The scorching will help reduce wicking into the surrounding wood, but care needs to be taken. Do not overload the brush with stain. Work slowly and carefully, rotating the bowl by hand as you progress
STEP 17: Allow the spirit stain to fully dry before you remove the bowl from the chuck. Remove the 45mm filler and replace with the 55mm filler, fixing this in with double-sided tape. Now remount the bowl on the off-set hole. Check the bowl runs true, and if not, rotate a few degrees and try again. Reduce the lathe speed to 500rpm
STEP 18: Draw a series of pencil lines, 10mm apart from a point about 5mm from the black bead. Continue until the surface is covered
STEP 19: Using the corner point of the parting and beading tool, carefully make ‘V’ cuts at each of the pencil lines. Remember that as you get towards the outer edge, the cut will be incomplete for some of the rotation. Do not apply too much pressure to the tool
STEP 20: With the point of the parting tool, begin to form the beads between the ‘V’ cuts. Avoid the middle of the bead and work first on one side and then the other as before. As you get towards the edge, this cut can be difficult to control, so take care. Aim for uniform beads
Top tip: Spirit stain is used for the colouring on this project but you could also use milk paints, acrylics, or metalized wax finishes to produce interesting and pleasing results
STEP 21: Once the beads are cut, take a 2mm parting tool and make a shallow, 3mm deep, cut between each bead
STEP 22: At this point, you need to stop the lathe and hand sand the beads. It is not recommended to sand with the lathe running. Once sanded, stain the beads in the same manner as previously, taking special care at the edge of the bowl to avoid splashing the underside. Let the stain fully dry
STEP 23: Now remove the bowl and, using the 45mm filler, remount on the centre hole. Take a freshly sharpened bowl gouge and carefully round over the outer edge, creating small areas of clean wood
STEP 24: With the lathe rotating at about 500rpm, carefully sand the edge, rounding over as you go. Take care as there are sharp edges waiting to snag the abrasive
STEP 25: Using a red spirit stain, stain the small areas of exposed wood. The red flashes add interest to the rim of the bowl. Allow the spirit stain to fully dry
STEP 26: Remount the bowl in reverse, using a friction plate, jam chuck, or cole jaws. Taking careful light cuts, remove the two drilled mounting points. Make the finished base slightly concave. Sand and seal with cellulose sealer. As a finishing touch, I have turneda small 10mm diameter ‘marble’ on a 6mm tenon and glued it in to a hole, drilled in the wall of the bowl
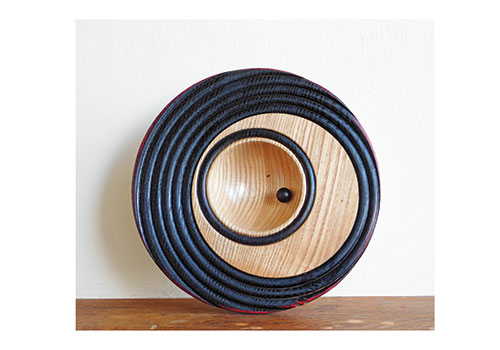
STEP 27: The finished bowl.