Michael Huntley constructs this robust garden planter

This planter is built to last and is finished to withstand whatever our fickle weather can throw at it. The slats allow for necessary drainage. It is deliberately constructed to be heavy, so place the completed planter in position before planting out, rather than after!
Preparation
Cut the timber to length using a chopsaw or handsaw. Clean up ragged edges. Mark a line 40mm up from the base of the legs. This is the underside of the first round of rails. There will be seven rounds in a 740mm-high planter. Lay the timbers on the legs and mark their height onto the legs. Extend the lines around the inside of the leg with a carpenter’s square. Mark the position of the short rails with a pencilled letter ‘S’. Lay out a short rail with a leg lying across it at right angles. Balance the other end of the leg with an offcut.
Technique
The construction is log-cabin style. This means that a long end rests on a long side rail. As we are starting with a short side rail in order to give us the exact distance between legs, the short rail must be placed between the second and third storey lines, NOT the first and second lines. If this is unclear, lay out all the cut pieces and do a dry run; the construction sequence will then become obvious.
Step-by-step
2 The screws are on the inside of the planter so that you don’t see a line of rusty screws on the exterior. Using your fingertips, set the rail back just inside the line of the leg and make sure that the leg is dead square to the rail, then place a weight on the leg to stop it moving. Drive in one screw and then check again for square before driving in the second screw.
Leg, bearers & rails
Fit the leg at the other end of the short rail, then fit a long rail below the short rail.
3-4 To give a small expansion gap use a metal rule as a spacer, then fit all the other rails, long then short, with expansion gaps between each rail. Make up the other long side using the same technique.
5 Fit the bearers to the bottom rails with screws and glue. These take a lot of weight so gluing is a good idea here.
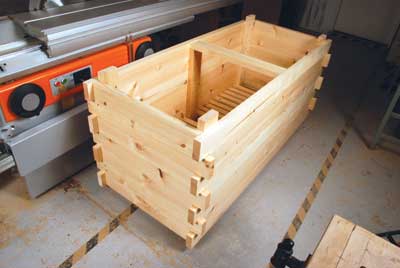
6-7 It will now be possible to stand both long sides up and loosely fit a couple of end rails. Once all is square and tight screw the end rails into position. Fit the final end rails and screw them into position.
Stand the central legs in position and screw them to the rails.
8 Fit the top tie bar using the longest screws you have because you are screwing into end grain. This screw head will be seen, so it could be plugged.
Slat work
Now you can measure the gap for the slats. Don’t cut them to length until you have checked the actual gap on your project. Finally, fit the slats in the base with single screws before covering with mesh and lining the interior with plastic.9-11 You will be left with a slat-free gap at each end and in the middle. The offcuts will make bearers for infill strips at each of these places as shown in the detailed pictures and the drawing.