John Bullar’s journeyman learns the traditional craft of hand veneering using hide glue

This telegraphed surface is the result of veneering one layer over dovetails cut in green oak
Applying veneers by hand without the need for a veneer press is an ancient tried and tested technique. It takes advantage of the unique properties of hot hide glue, manufactured from animal skins. This versatile system can be used on areas of any size as well as on curved surfaces and it is forgiving in that it allows rework or repair at any time.
Hand veneering uses a few simple tools which can be bought or improvised in the workshop and is not difficult to learn with a little practice on veneer offcuts or cheap samples.
Commercial veneers
Modern commercial veneers are produced by ripping large logs into billets, known as flitches. Heavy with moisture, each flitch is mounted on the moving carriage of a veneer slicing machine where a fixed knife blade repetitively peels away sheet after sheet of veneer. The veneers pass in sequence through a warm air drying machine in which the thin wood gives up its moisture quickly while rollers press it flat.
Veneer produced in this way typically emerges from the process 0.6mm thick, although other gauges are available. Because the knife produces no kerf thickness there is no waste from the flitch, so minimising the environmental impact and cost of materials.
Slicing in this way can produce thousands of square feet of veneer from a single large tree and, importantly for the furniture maker, it also produces an excellent figuring match between adjacent pairs of veneers.
The manufactured veneers are stored and shipped in sealed wrappings, keeping each flitch in the order it was cut so that sets can be matched by the customer.
Rotary peeling, a variation on this system, is used, pencil sharpener like, to extract long continuous sheets from a prepared rotating log. The figuring has a distinctive but rather unnatural look and tends to be used as constructional veneer or for manufacturing plywood.
Selected veneers
Woods with the best figuring are selected and saved for making face veneer where the high yield gives the raw material many times the value it would have if converted to solid wood.
The furniture maker chooses veneers for appearance but also has to bear in mind their behaviour.
Burrs and irregular grain produce delicate veneers that tend to crack with uneven movement and can be harder to work, often needing to be moistened before they will flatten.
End grain veneers are dark and highly porous to glue. While hand veneering, they can be sized with dilute hide glue to fill grain before scraping and sanding ready to finish.
Often there is a difference between the two sides of a veneer from where it has curled as it was cut, the inside of the curl being tighter grained. Although the adjacent faces may be an exact mirror image in pattern, they may not match well when finished because of this difference in surface density. This presents a challenge when laying book matched and quartered veneer patterns.
Kitting up
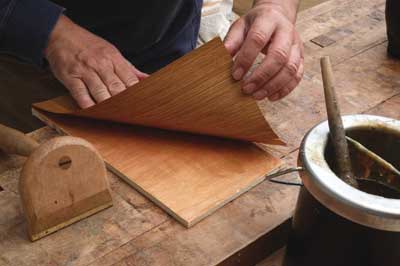
You need a clear flat area for laying out and cutting the veneer. The only essential specialist tool for this job is the veneer hammer, not really a hammer at all but a hammer shaped tool with a smooth brass edge for pressing the veneer into the glue.
The veneer saw is small with fine teeth on a curved blade. The teeth are filed so they have no angle of attack and work equally in either direction. The teeth work best if they are ground each side so they act as a series of fine knife tips. The veneer saw is by no means essential and with a little more patience can easily be substituted with a knife.
A hot glue pot containing freshly made up hide glue is needed. It can be a traditional double pot, an improvised double boiler made from two cooking pans, or an electric pot.
Other equipment needed is a craft knife, a straightedge and a bucket of hot water with clean damp rags for removing surplus glue. An old smoothing iron is very handy for reheating glue beneath the veneer but it will inevitably pick up burned glue and never be the same again for laundry.
Groundwork
The groundwork, also known as the substrate or core, is the base material to which you apply the veneer. Traditionally the groundwork would have been solid wood, typically pine for its low cost and easy workability. Because the wooden core undergoes seasonal movement across large areas the veneer needs to follow the same grain direction to stop it being torn away.
MDF has excellent properties for use with a veneer press, being thoroughly uniform and stable with no grain direction. Plywood is best for use in hand veneering with hide glue to which it provides excellent adhesion. If practical, apply veneer at right angles to the face veneer of the ply, continuing the sequence of alternation in the ply.
Preparation and speed
Like all glue up tasks, hand veneering has to be done quickly from the moment the first glue is applied to the moment the last veneer is pressed down. This means you should take as much time as necessary to prepare and plan beforehand, ensuring all equipment and materials are in reach.
Veneering process
After soaking and draining the dry glue, heat it in an equal quantity of water in the glue pot. For veneering it must flow freely off the brush but set to a stiff gel within a couple of minutes of cooling, if necessary with the addition of warm water every 10 minutes or so. Ensure there are no lumps of undissolved glue or debris in the pot.
Apply the hot glue to the groundwork fairly generously with a wide glue brush. This will help keep it warm and flowing while any excess will be squeezed out from under the edges.
Also apply glue quickly and thinly to both sides of the veneer. The glue on top is for balance to prevent curling and for lubrication, while it also acts as a grain filler and sealer.
Hammer pressing
The veneer is laid in place and, still hand-hot, pressed firmly against groundwork with a squeezing action, drawing the straight edge of the veneer hammer along the grain to avoid tearing it.
Work from the middle outwards to squeeze out excess from the ends, moving quickly while the glue is cooling all the time. The objective is to leave a uniform spread of glue bonding veneer to substrate.
Lumps & bubbles
As the glue sets in the initial cooling phase, feel for bumps under the surface with your fingertips and also tap to listen for hollows or bubbles of air. The glue should not yet have lost its moisture so heating the surface with an iron over a thin damp cloth will soften it, allowing you to press again with the hammer. The cloth reduces scorching but will end up soaked in glue, so rinse before each application.
To remove excess glue from the middle of a panel or apply more to a dry patch, slit along the grain and lift the edges with a craft knife. Always press into place with the hammer rather than the iron, which should only be applied lightly.
Veneering edges
Veneer lippings can be applied to cover the edges of a substrate. Panel edges are normally veneered before faces so they can be trimmed to width first. Along the grain direction it is easier to cut the veneer to width with a knife than with a veneer saw working against a straightedge in several passes. The edge of the ply substrate is coated with hot glue before the veneer strip, slightly over-width, is pressed in place with the hammer.