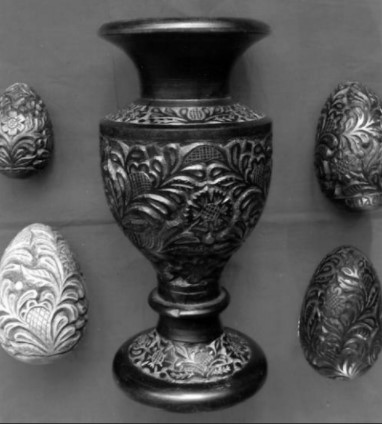
This type of flat carving was born in the village of Kudrino near Moscow, so people call it “kudrinka”, and its ornamentation is curly. The basis of the pattern are elements of plants, consisting of stylized leaves, buds, flowers. Sometimes they add images of birds, animals and characters from Russian folklore. I think it is not bad, making furniture with your own hands, to decorate a shelf, a cabinet with such an ornament. In this case, you can also use the techniques of applied carving. A fragment of the composition is cut out and glued to the flat surface of this furniture object. Such reliefs are carved on linden, aspen, alder and hardwoods – mahogany, ash and oak – are also used. The latter have a shiny cut, but you will have to add effort and sharpen the carving tool more often. Traditionally, Kudrin’s relief is carved with chisels, both chiseled and semi-circular. I suggest another variant, no less effective. If you do not have chisels yet, but the desire to carve appeared, you can create kudrinka with a knife with a narrow spout. I call it “universal”. It will be possible to master the techniques of such carving with a tool, which is not difficult to buy or make yourself. It will also come in handy in further work with reliefs and sculpture, together with other chisels. Do not forget to make the tip of the knife narrow by sharpening the blade on both sides. It will easily cut small radiuses of the details of the ornament.

When the tool is ready, first practice on a test board by holding the knife in two ways. In the first, hold the handle of the cutter in your fist so that your index finger and thumb hold it in front of the cutting blade of the knife. Hold the workpiece in your left hand. Leaning the edge of the blade against the thumb of the left hand that holds the workpiece, make a semi-circular motion with the knife without taking it away from your finger. At the same moment you cut a thin chip. Practice this movement. Be careful not to hit the left hand index finger that holds the workpiece with the nose of the blade – you may hurt yourself. The second method of cutting the wood is similar to cutting the skin of a potato with a knife. It is easier to perform, but you need to make sure that the blade after cutting the wood shavings does not stick into the thumb of the right hand, but passes above it.
Having mastered these two techniques of carving with a knife, you will be able to successfully cut off excess material, performing Kudrin ornaments. The same technique will be used to create reliefs, plastic forms and sculpture in future works, releasing them from solid wood. After the first training, draw a complex composition of straight and curved lines. Try to cut them on both sides at a distance of 2-3 mm at an angle of 45° with a knife using familiar techniques, observing the direction of the wood fibers. Then proceed to making uncomplicated, rounded loops – a simple element of the curl pattern. Cut on both sides, at an angle of 45°. Having cut two or three elements, finish drawing the next few loops, leaves, building up the composition. It is built by evenly distributing simple and complex components, when you decorate your product – vase, plate, casket, etc. – with such an ornament.
By learning to carve such an ornament, you will master the technique of carving with a utility knife. After completing the carving, with light pressure, wipe the product with a fine sandpaper over the layer, clean it with a dry brush. Often the product and in light colors looks good, but you can cover it with one of the stains, the color that first try on a small board of the same species. Soak the product in water before staining. Apply the stain with a brush or brush, layer by layer and crosswise. If you wish to lighten the ornament before the stain dries, wipe the surface with a wet rag. Another way to lighten the stain is to rub the surface with a sandpaper layer by layer after the stain has dried.
Sometimes the carvers before drawing on the billet, they seize it, and then, after drying, begin carving. The drawing turns out dark and the background light. For each work it would be correct to choose a different approach, so decide for yourself at what time and how to decorate the product. To learn and gain experience, try all options. For the final treatment I recommend to wax the surface of the piece and then rub it with a brush. Suitable also nitrolac, which should also be rubbed with a brush, but 1-2 minutes after application, until the lacquer runs in the corners of the background. After 30-40 minutes, brush the lacquer surface one more time over the layer – this will give a good wax sheen.


