Mortise and Tenon joints are some of the strongest joints possible. When well made and properly fitted these joints have formed the fundamental and virtual framework of furniture for millennia. Mortises are usually square holes, however round holes drilled in wood can also be a mortise. Those are relatively easy to make, what I will be dealing with here is square or rectangular mortises, both stop or blind and through or exposed. I will describe the method of making a rectangular mortise, perpendicular to the wood. Angled mortises require the same techniques only tilted.
You can make a mortise with nothing more than a chisel. A few other tools such as a mallet or maul and a brace and bit makes the work go easier. While almost any chisel can be used, the specialized mortising chisels with thick blades and absolutely square sides not only cut but help form the square or rectangular shape of the mortise. These chisels are designed to cut and chop the mortises easily. The thick shank and blade allow the chisels to be levered against the end of the mortise to pry away the grain at the bottom of the mortise. Stout well made mortise chisels are a pleasure to own and use. It is a good idea to have sharp corners on all edges of the mortise chisel even up the blade to the neck near the tang or socket. These sharp edges can be used to smooth up the sides or cheeks of the mortice by rocking it back and forth in the mortice. While it is not necessary to have these sharp edges and some old chisels do not, they can be handy.
You need to start with square material. The place where the mortise is located should be flat and square to the side. Special cases may require something different but the surface should be flat to insure that the shoulders of the tenons rest flatly against the work. The mortises are cut first and the tenons are cut to fit after. The tenons are easier to adjust and fit into the mortise than it is to modify the mortise. Lay out your mortise where you want it to be, a marking gauge can be used to mark each side of the mortise. A rule for the size of a mortise is determined by the size of the piece into which the mortises are chopped. A general rule is the mortise should be greater than 1/3 and less than ½ the width where the mortise is placed. This insures that there is enough material on each side of the mortise to provide strength. A special mortising gauge can be used that marks out both marks on each side or the cheeks of the mortise, how wide the mortise will be. Use a square to mark across and delineate the length of the mortise at both ends. Use a striking knife or scratch awl to mark the ends of the mortise, so that the mortise is scribed all the way around. This helps prevent the wood from splitting because it is scored and the score lines give you a place to position the blade of the chisel. And you do not have to deal with the vagaries of the width of a pencil line. If it is a through mortise, mark both sides. When mortising through a piece of wood, you work from both sides and try and make ends meet. This prevents chipping out the grain on the backside of the wood. Use your marking or mortising gauge from the same face of the wood to insure that the through mortises will line up. It is a good habit to get into, to always mark from the same side or face. This will keep your work consistent. It also is a good idea to put witness marks on your work so you know which tenon goes into which mortise and keeps the same side of the work oriented properly. On traditional woodwork these marks are usually Roman Numerals as they can be made with a chisel to make the straight lines of the ‘I’, ‘V’ and ‘X’.
- Using a marking gauge to scribe cheeks.
- Using a square to layout ends.
- Mortice scribed into the work.
- Drilling a relief hole in the center of the mortice.
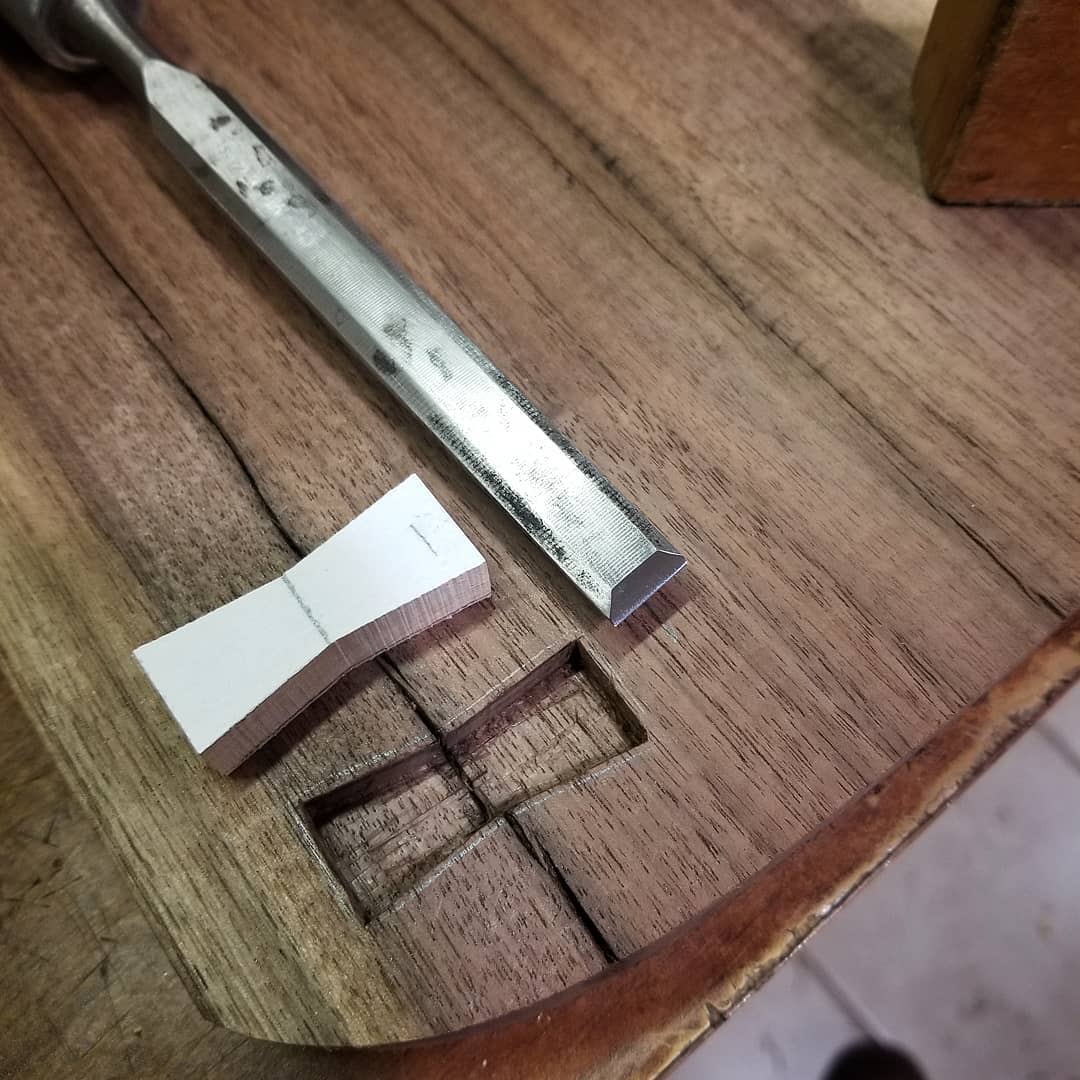
- Making first cut across the ends to mark out the mortice.
- Shows how to chop a mortice without drilling first.
- Second cut, working from the center out.
- As the mortice gets wider the deeper the cut.
- Finishing out squaring the mortice.
- Shows the stages of widen and deepening of the mortice.
- Using a swansneck or gooseneck chisel to clean up the bottom of the mortice.
- Using a regular chisel, bevel down to clean the mortice bottoms.
To begin with as in any project make sure your tools are properly maintained and that your chisel is clean and sharp. You will need a mallet or maul, do not use a metal hammer, they strike too hard and will damage your chisel. The hard metal of a hammer strikes sharply and bounces with much of the energy lost in the bounce. The mallet or maul strikes firmly and the material from which it is constructed dampens the bounce and the energy goes into the chisel. It helps to have a drill. A brace and bit works well and it helps to have a long bit. I even use a 24″ extension for my brace; this enables me to better eyeball the drilling process, keeping the drill perfectly square to the work surface. Use a square to help guide you; anything you can do to make that hole square will make the rest of the job much easier. I drill one hole near one end of the mortise. Some people drill several holes and remove as much of the wood as possible. I prefer one hole and chop the rest of the mortise with the chisel. The single hole provides a place for the chips to fall and makes the first cuts easier. To do this without a drill start in the center and cut out a V shape, first from one side then from the other, going deeper each time. This gives a place for the chips to escape. Continue until you approach the marks at the ends of the mortise, then chop square down to finish the mortise.
Line up the chisel across the grain of the wood right on the scribe line of your layout. This score line will actually give you a place to position the blade of the chisel. Some start inside the line and go back after the mortise is chopped and clean up the ends. I prefer to start at the line and get it right the first time so I do not have to go back. The first blow with the mallet should be light you want to begin the cutting but you do not want to force the chisel beyond the line by the wedging action of the bevel of the chisel. Make your first cut on each end and then use a flat bench chisel the same size as the length of the mortise to cut the sides or cheeks of the mortise. Again do not hit your first cut too hard, just delineate the sides with the first cut. You can also use a straight edge and a sharp knife to mark out and scribe the cheeks of the mortise. The mortise chisel will chop the sides as it cuts the cross grain. Go back to the mortise chisel and start at the end with the hole. Place the chisel in the first end cut, hold it square and strike the chisel with the mallet. The chips should fall into the hole. Turn your chisel around and place it on the other side of the hole, hold the chisel square and strike it with the mallet. Work down to a certain depth and continue. It is difficult to chop a mortise to its finished depth all at once; you want to go down in stages. Work along the mortise until you get to the other end, making sure that you are square and perpendicular. Go back and continue until you are at the desired depth.
If you are cutting a through mortise work from both sides and meet in the middle thus preventing split out and leaving a neat joint on both sides. This insures that the exposed mortise will be a clean joint. If there are some irregularities in the cheeks, you have some degree of error. You can add shims, extra glue if you have to. You will eventually want your mortises tight but problems do happen. Bottoming out the stop or blind mortise can present a problem. There are swans neck mortise chisel designed especially for that purpose. I have used them and the work well. You can get roughly the same results by using the mortise chisel backwards, turn it over and you can chop the bottom of the mortise with the bevel side down. Levering the mortise chisel against the ends and scraping the bottom with the end of the chisel also works. You need to be careful not to round over or damage the wood at the top of the end of the mortise. If these are covered by the tenon member’s shoulder, you will want to slightly chamfer the edges. This eases assembly and gives a place for the glue to go. The edges of the tenons should be slightly chamfered for the same reasons. If it is a through tenon you do not want to chamfer the ends of the tenon. If it is blind, the ends of the tenon should be chamfered.
These mortising techniques work for chopping large construction mortises, small hinge mortises, half mortise lock mortises, any mortise. Even dovetail joints are constructed with modified mortise and tenon joints. You want to mark it out well, make your cross grain cuts first, delineate out the cheeks and removing the wood in between. It becomes second nature to hand chop mortises and you will constantly be learning because each new piece of wood becomes an individual challenge to work with its grain and determine its nature. Most of the time you will be working down into a mortise. You may have to mortise horizontally on occasion. It is a matter of getting used to doing the same thing sideways. At times it helps to turn the mortise on its side and work on the cheeks with a flat bench chisel or long paring chisel. Turn over if possible and work on the side that is down. A skew action with the chisel can help pare off difficult wood on the inside cheeks of the mortise.
The mortise (together with the tenon) is the most important joint in woodworking. The dovetail joint is after all, a mortise and tenon joint. A simple half lap joint is made with two open mortises, well that is pushing it. A properly constructed mortise and tenon joint is strong and traditionally the joint of choice. It is important to be able to do this joint, you don’t have to do all of them by hand, but you need to know how to make them. Understand that a properly made mortise and tenon joint will last for years. That the proper fit, the tight joint will not come loose. Good wood contact makes a good gluing surface. If the joint is not glued you want the tightest joint possible. While some mortises are glued, others are pegged, others wedged, either internally or externally such as a fox wedge joint or tusk tenon. The joint is used for knock down furniture such as trestle tables so they can be taken apart and stored or easily transported. These are finished and exposed joints, part of the decoration and part of the construction, these must look good.
Shallow mortises such as those used for hinges are easy to make but require more accuracy. They need to look good and they need to properly hold the hinge into the wood. You can not just rely on the screws or nails, you want your mortises to be tight, support the hinge on its sides and be flat on the bottoms for a uniform instillation and function of the hinge. Making the bottom of the hinge mortise flat can be accomplished using a variety of tools. Off set chisels that can fit down flat to the bottom of the mortise to flatten and smooth the bottom of the joint. A small router plane or Old Woman’s Tooth router can be used to flatten the bottom. A skew or paring chisel can be used bevel down to flatten the bottom of the mortise. Any method you choose that makes the bottom of the mortise flat is what you are after.
The mortises for half mortise locks and blind dovetails can be cut with a saw on the cross grain of the mortise or the sides of the dovetails. Frequently on traditional furniture the saw kerf goes far beyond the line for the mortise or dovetail. On the inside or back of a door or drawer and not seen, the originating craftsmen did what was easier and that is to saw well beyond the line, making the rest of the mortising process easier. Some half mortise locks have overlapping double mortises. One for the lock plate and one for the lock works. Actually they have three with the keyhole, another mortise, they are everywhere. I recently repaired a pine, painted and grained chest of drawers made in Utah in the 1860’s with a single lock on the top drawer. It had 6 mortises for the half mortise lock: one for the key hole, one for the back plate, one for the top plate, one for the lock works, one for the bolt to travel through to lock and one for the bolt to retract into.
I have done repairs on many old cabinets and have seen half mortise locks, dovetailed into the back of the drawer. Some of the locks were intended to be dovetailed and had dovetailed lock plates. Others were regular half mortise locks with the dovetail, holding on and securing the lock in place by the back plate on the lock works fit into the dovetail. Other types of cabinet hardware require mortising, stops or stays, catches, handles, knobs, etc. can demand a variety of mortising techniques, remember you are making square holes. And there are even methods of drilling square holes and craftsmen have been doing it for hundreds of years.
I have neglected the tenon because that is a relatively easy part of this joint to make and it should be made after the mortise and fit to it as it is easier to work and resize. The size that the tenon is going to be cut is determined by the finished size of the mortise. If a marking gauge was used to layout the mortise it can also be used to layout the tenon. The depth of the mortise determines the length of the tenon where the shoulders are laid out and cut. The length of the tenon should be slightly less than the depth of the mortise to give the glue a place to go and prevent the tenon from bottoming out. The square should be used with an awl to mark the shoulders and the cuts are made with a stiff back tenon saw. The reinforced back keeps the blade very straight to produce a straighter cut. Once the shoulders are cut, on some woods the waste can be chipped off with good results if the grain is straight and relatively easy to split, especially on short tenons. If the wood is difficult to split or the grain is irregular or the tenons are long, then the waste must be sawn using a ripsaw to remove the wood with the grain. A sharp chisel can then be used to smooth up the cheeks of the tenon to fit properly into the mortise. A rasp or file is also helpful and provides a key for the glue to have better adhesion. I always chamfer off a little on the sides and ends of the tenon, this allows for easier assembly and gives a place for the glue to be squeezed. If the joint is knockdown or capable of being taken apart then no glue is used, however in most applications glue is used to hold the joint together. Make sure to apply glue to all touching surfaces of the mortise and tenon, especially the end grain, assemble, clamp and allow to dry. Some mortise and tenon joints are pegged to further reinforce this strong joint and this is usually done after assembly. However on some applications a draw peg is used and this must be done prior to assembly. The location is marked with a scratch awl making sure the peg is not too close to the end of the tenon or top of the mortise. A scrap of wood is placed in the mortise to prevent the drill from splitting out the wood on the inside of the mortise. The hole is then carefully drilled with a piece of scrap on the backside to prevent the exit hole from chipping out. The scrap is removed and the tenon is placed in the mortise and clamped to its final position. The hole is marked and the tenon is removed. A mark is made about a 1/16” closer to the shoulder of the tenon than the mark made when assembled. This hole is then drilled in the new position through the tenon, again backing up the work with a piece of scrap wood to prevent chip out. Glue is then applied to the joint surfaces and the peg and this slight offset will ‘draw’ the tenon tight into the mortise when the peg is driven home. The ends of the pegs should be chamfered or slightly pointed to properly pass easily through the holes without chipping the wood out on the backside.
